


Whether it is an outdoor LED Video Wall or an indoor LED Screen, all LED screens need a control card. The control card generally has a main card and a secondary card. The main card is the sending card, and the secondary card is the receiving card, which plays the role of sending data and receiving data respectively. role. Large LED displays require adding a video processor or splicer.
The LED display screen is spliced into a complete unit LED display screen by LED module unit, LED switching power supply, receiving card, wire, and sheet metal or rental box.
So how to set up this unit’s LED display?
First, you need to carry out the Smart setting of LED modules through LEDSET, and then set the loading resolution of the receiving card according to the number and resolution of the modules. In this way, the unit LED display screen is set, and all cabinets perform the same operation. Finally, All LED display cabinet units are cascaded through software to form a complete LED large screen.
The following is a detailed demonstration of the installation and setting steps of the Huidu Controller.
Chapter 1 Install and Uninstall…………………………………………………………………………………….. 1
- Software Install………………………………………………………………………………………… 1
- Software Uninstall …………………………………………………………………………………… 3
Chapter 2 Network setting …………………………………………………………………………………………… 4
Chapter 3 Hardware Setting(Debug Screen)……………………………………………………………….. 1
- Send card parameters …………………………………………………………………………….. 1
- Connection settings ………………………………………………………………………………… 1
- Receive card parameters ………………………………………………………………………… 2
- Smart setting……………………………………………………………………………………………… 5
Chapter 4 Edit the Program …………………………………………………………………………………………. 8
- Software Interface …………………………………………………………………………………….. 8
- Program Structure ……………………………………………………………………………………. 9
- New Screen……………………………………………………………………………………………..10
- Adding programs…………………………………………………………………………………….11
- Add Custom Area ……………………………………………………………………………………13
- Add video, pictures, animation, forms, and other source files………………..14
Chapter 5 Program Update…………………………………………………………………………………………… 1
- Network Cluster sending……………………………………………………………………….. 1
- Update program by U-Disk ………………………………………………………………….. 1
- U-Disk expand memory Limitless ………………………………………………………… 2
- Device lock setting…………………………………………………………………………………………… 1
- Brightness setting…………………………………………………………………………………………… 1
- Time correction…………………………………………………………………………………………… 1
- switch machine setting…………………………………………………………………………………………… 1
- Hardware parameters…………………………………………………………………………………………… 1
- Firmware updating…………………………………………………………………………………………… 1
- Wi-Fi setting…………………………………………………………………………………………… 1
5. Brightness setting ……………………………………………………………………………………………………… 4
Chapter 6 System Setting …………………………………………………………………………………………….. 1
Chapter 7 System Control……………………………………………………………………………………………. 2
- play mode setting………………………………………………………………………………………. 2
- Brightness setting…………………………………………………………………………………….. 1
- Time Correction ……………………………………………………………………………………… 3
- Screen Testing………………………………………………………………………………………….. 5
- Firmware Update……………………………………………………………………………………… 6
- Switch machine settings……………………………………………………………………………. 7
- Update device name………………………………………………………………………………….. 8
- Direct search by manual……………………………………………………………………………. 9
- Start-up screen …………………………………………………………………………………………10
- Device Reboot ……………………………………………………………………………………….10
- Wi-Fi settings…………………………………………………………………………………………11
- Trial authorization………………………………………………………………………………….13
- Relay setting…………………………………………………………………………………………..14
- Network settings…………………………………………………………………………………….15
Chapter 1 Install and Uninstall
Huidu controller Software Install
1)Open the CD, double click the icon HDPlayer.X.X.X.X.exe(Like: HDPlayer3.2.97.0.exe). Select the installer Language, click “ok”.

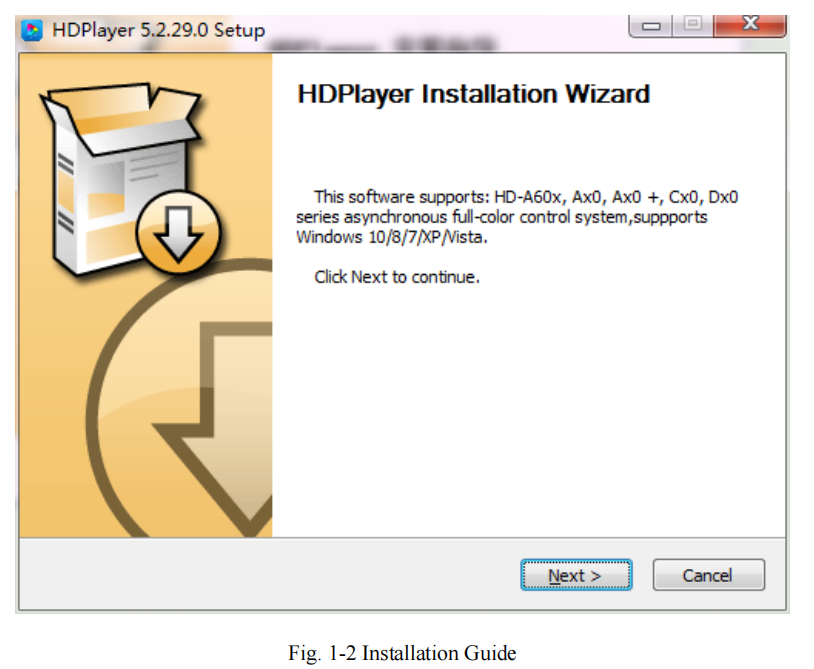
2)Installation Interface, Click “next”.
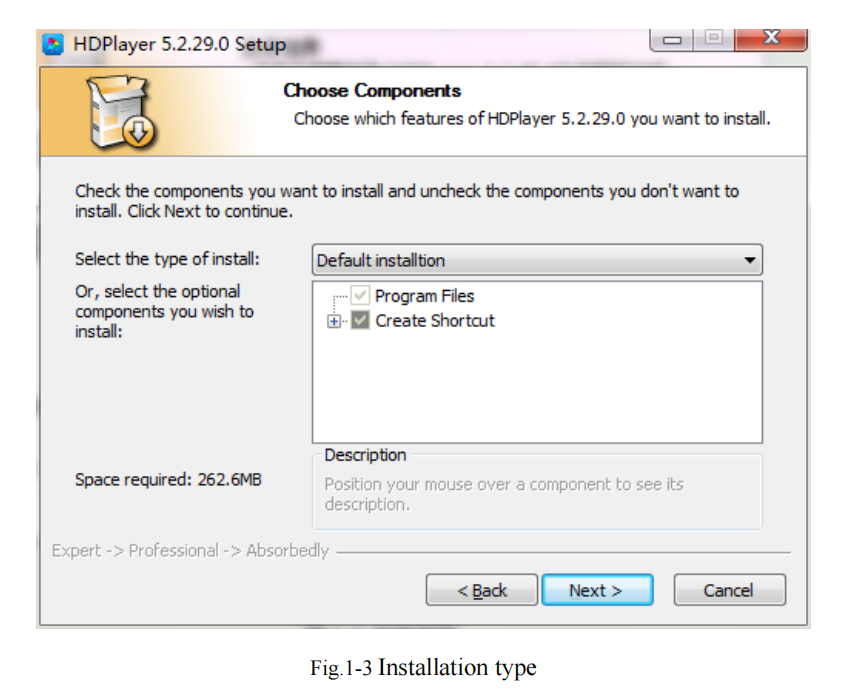
3)Confirm the Installation type, Click “Next”
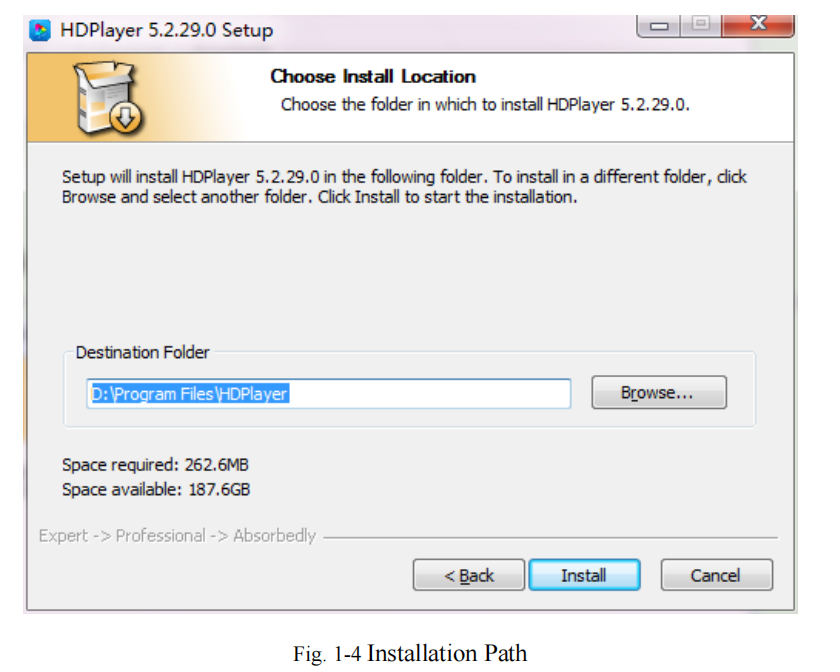
4)Choose Installation Path, Click “Install”.
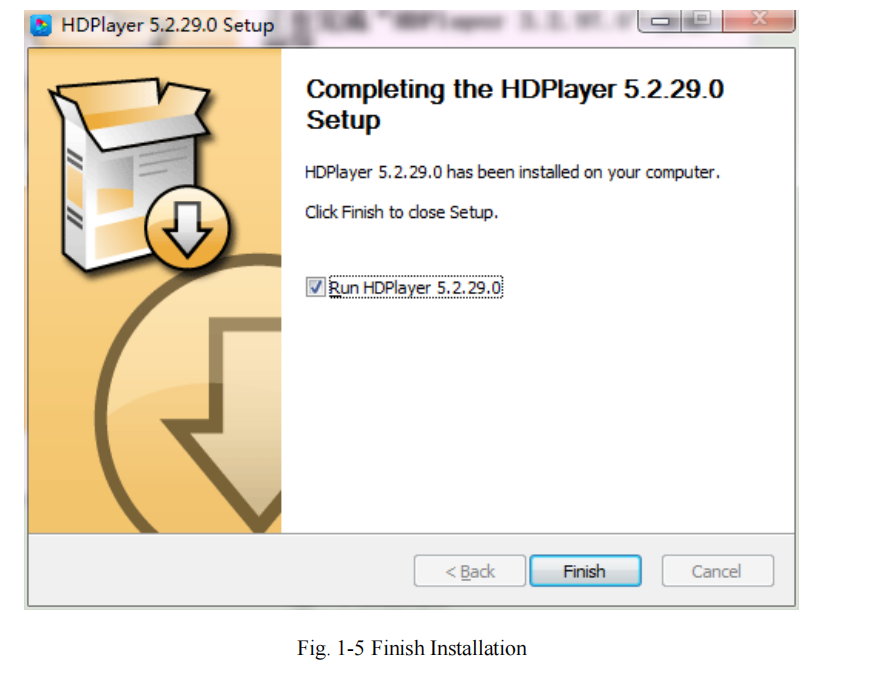
5)Click “Finish”.
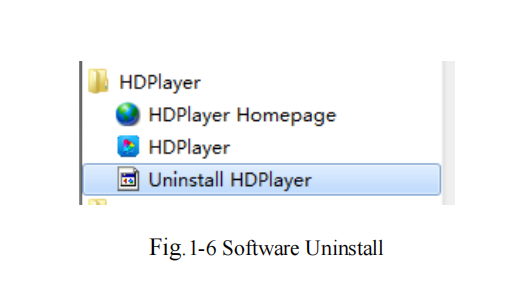
- Software Uninstall
“Start”→ “All Programs”→“HDPlayer”→“Uninstall HDPlayer”
Chapter 2 Network setting
The controller can connect to the computer directly. It can also connect to the computer via the Router. No need to do a network setting.
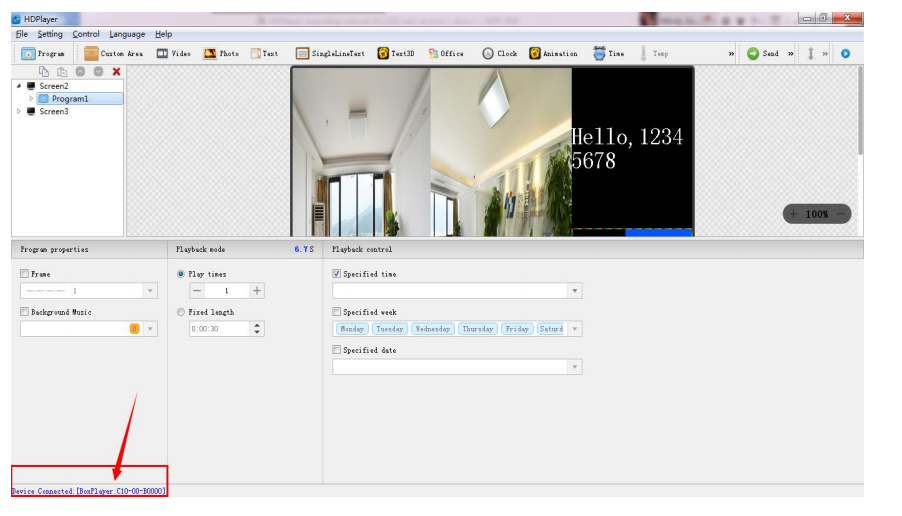
When connected to a computer, the network port (The Greenlight always flickers, and the orange light is bright), then wait for a few seconds (Windows XP needs more than 50Seconds, Windows 7 only needs 40Seconds). When the right corner of the computer shows Network normal (see below), it means it has been connected to the network, ——then
Open the software HDPlayer, it will find the controller ID automatically

If the cards connect to the computer via the Router, then the computer can control
all the cards at the same time.
Control cards network setting:
Obtain IP automatically: tick ‘Set’ then tick ‘Use’ then select ‘Set’ in the Bottom right corner. Get IP manually: tick the “Set” option, and then remove the “Use” option to set the IP
and other network information of the control card. After setting, you need to select the “Set” button to take effect.
(Note: Use this function with caution! The IP must be in the same network segment as the computer’s local connection).
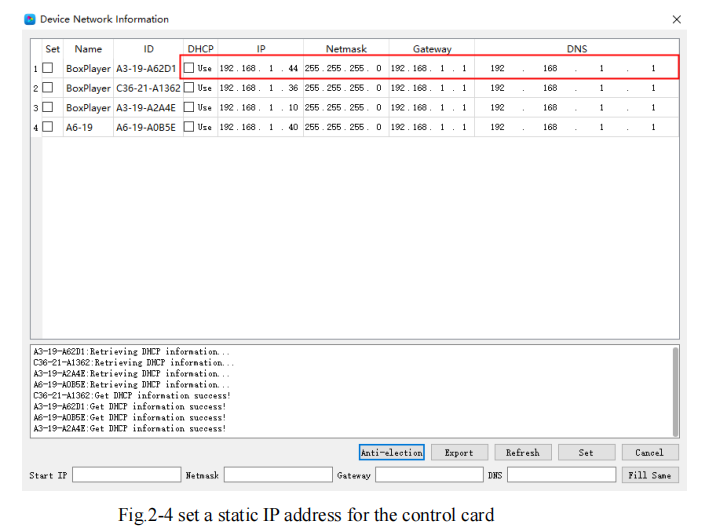
When the control card is controlled across network segments in the local area network, it is necessary to set a static IP address for the control card, Click ‘Control’ – ‘Other
setting’- ‘Device Network Information’, Enter the IP of the network segment where the control card is located, and it can not conflict with other IPs
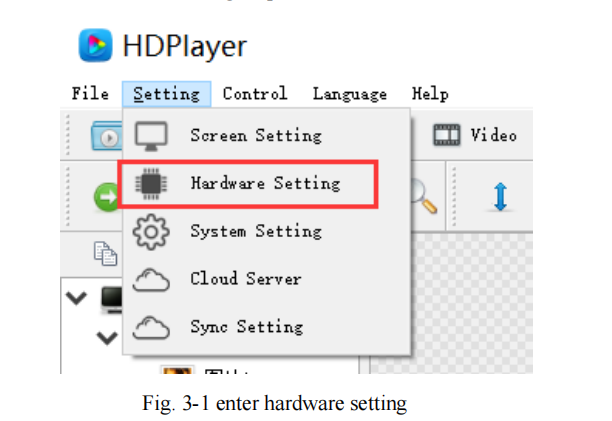
Chapter 3 Hardware Setting(DebugScreen)
Click “Settings” → “Hardware Settings”, password 168 to enter the hardware settings.
HDSet is a debugging software shared by the full-color synchronous and asynchronous series, The settings window is divided into Screen Configuration,
Firmware upgrade, Screen test, multi-function card, and Other.
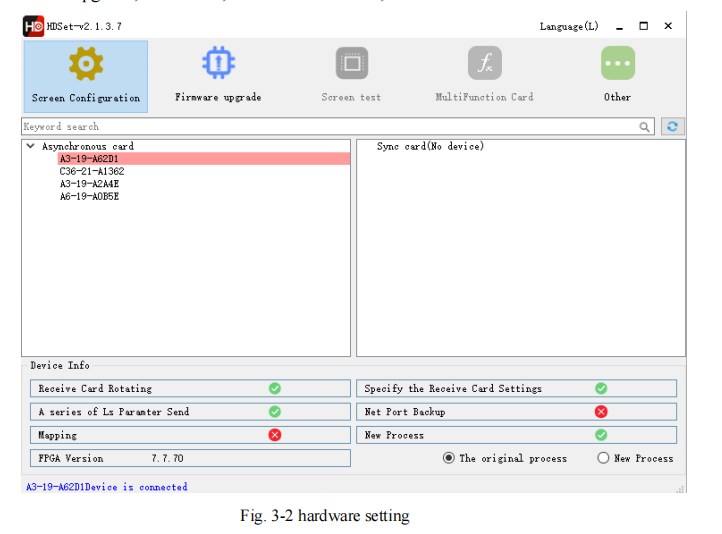
Screen Configuration: Used when debugging the screen, including three sections of sending card parameters, receiving card parameters, and connection settings;
Firmware upgrade: Support the upgrade of the receiving card, synchronous sending card, and video processor; (asynchronous sending card is not upgraded here)
Screen test: Open on the computer desktop, screen test window; (used for synchronized system)
MultiFunction Card: Synchronize the settings of multifunction card Y1
Other: Video processor setting and calibration, etc.;
Next, we introduce the use of sending card parameters, receiving card parameters, and connection settings in the display configuration. Other functions are not introduced
here. For details, please refer to 《HDSet Instructions》
1. Send card parameters
In the sending card parameters, Other parameter information such as the version of the receiving card can be detected
Note: In the interface of “Send card parameters”, click “send”, only send the send card parameters, if you want to send “connection setting ”or “receive a card
parameters”, need enter to the interface of “Connection Settings” and “Receive Card Parameters”.
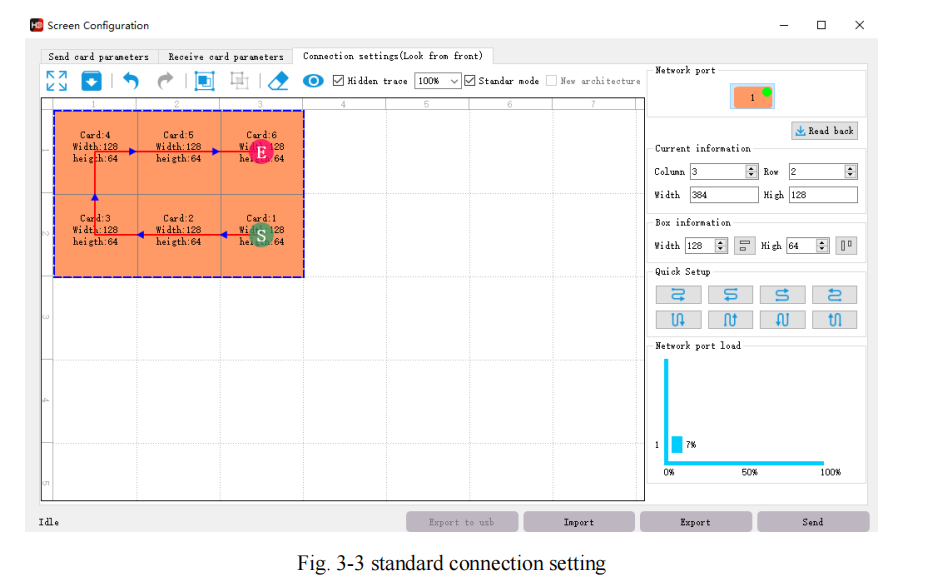
2. Connection settings
Click “Connection Settings” to enter the interface of connection settings.
This page can quickly and easily set the connection of the receiving card. From the front of the screen, card 1 is the card connected to the sending card, and next is the card
2…and so on.
3. Receive card parameters
Click ‘receive card parameters’ , this interface is for the gray level, refresh rate, and PWM register parameter settings, the parameters of this interface directly affect the effect of the LED display screen.
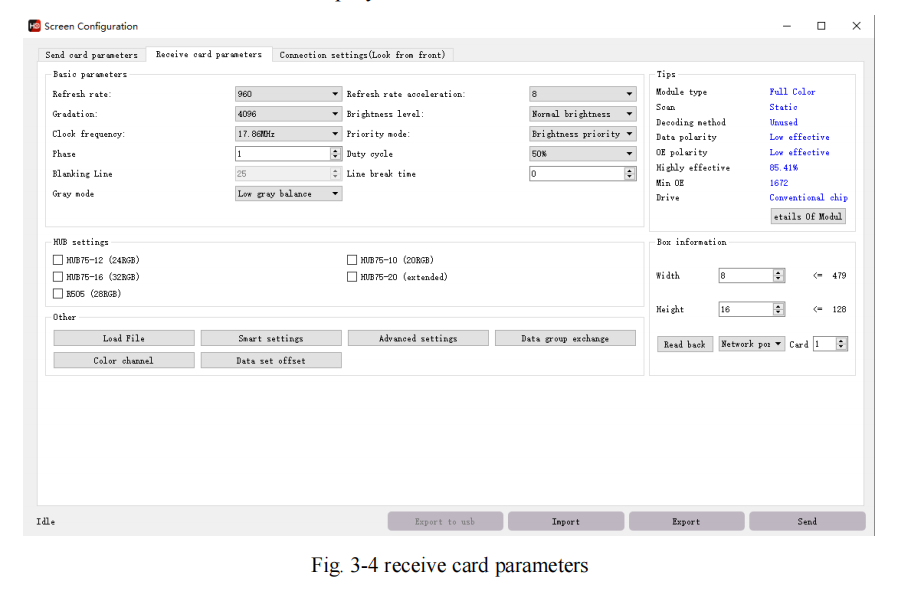
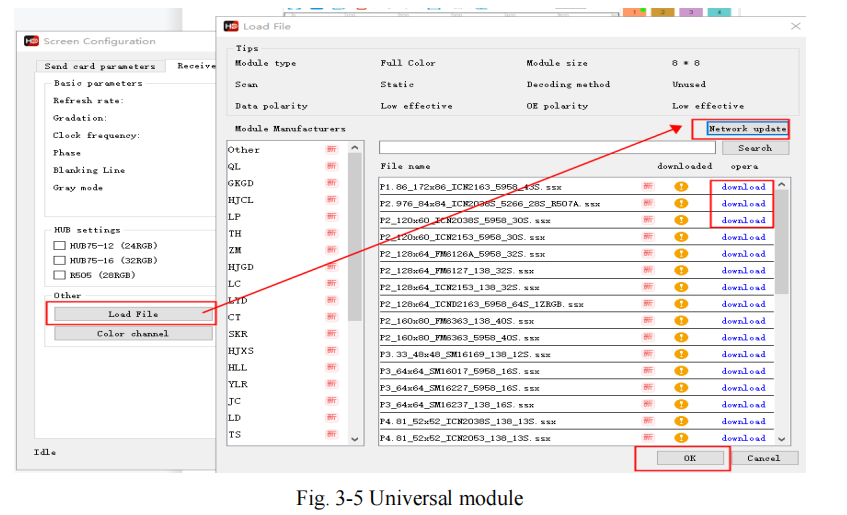
1) Load File, When the computer is connected to the Internet, you can download the configuration files of each manufacturer, and then connect the device, select the corresponding file, and click “OK”
(If you can’t find the corresponding parameter file, refer to point 4, do smart setting.)
2) Smart setting, for all LED Display modules, if there is no corresponding configuration file in ‘Universal module’, the module parameters can be set by ‘Smart
setting’.——For details, see section 4.
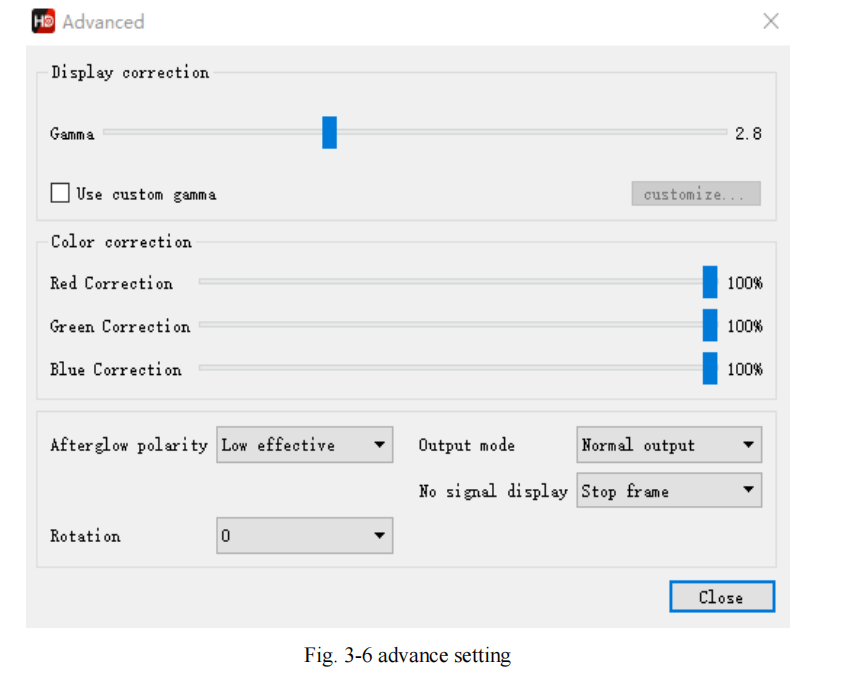
3) Advanced setting, In this interface, you can adjust gamma, color correction, and other parameters to further adjust the effect of the LED screen display
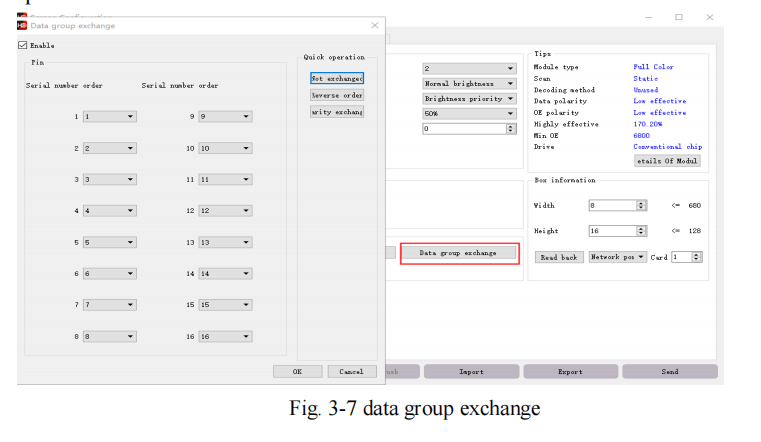
4) Data group exchange, used to exchange output data from one port to another port
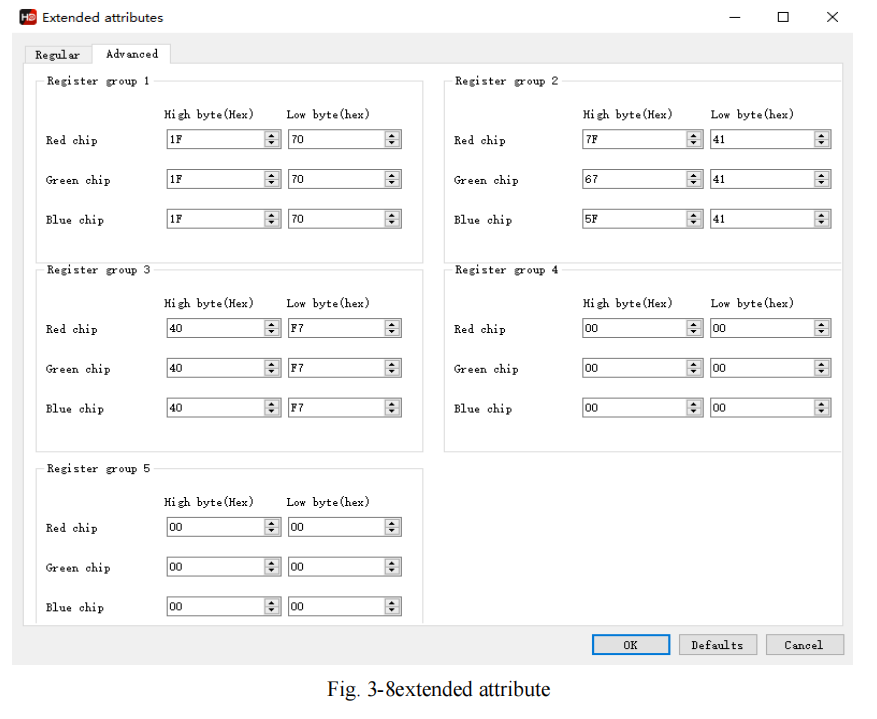
5) Extended attribute, used for some special IC, such as high refresh rate IC. Register configuration is required to set up with this function.
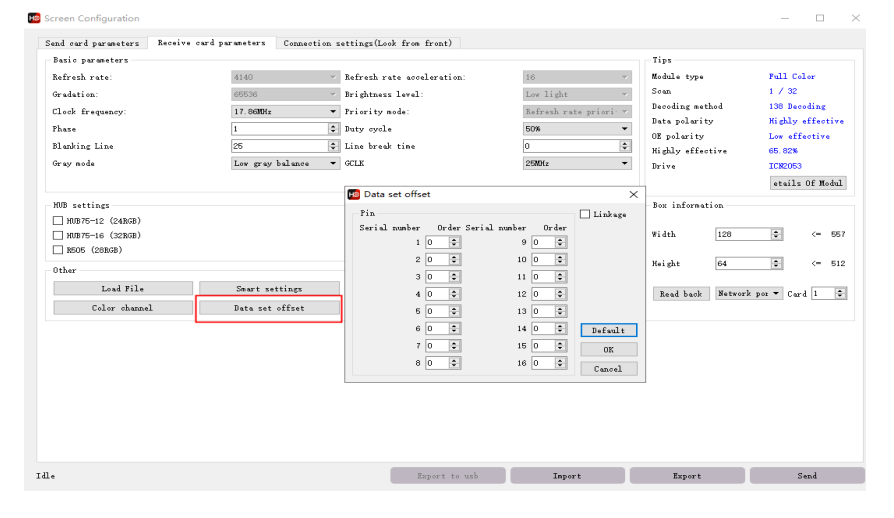
6) Data set offset, used for some non-rectangular screens, such as Pharmacy LED cross screens, we can choose the data set offset to make it display ok.
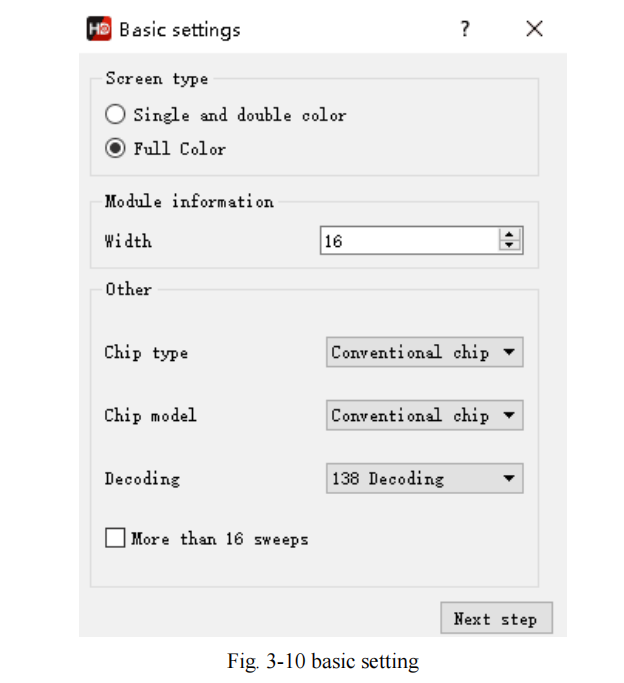
4. Smart setting
1) The first step for Smart setting, is to set the screen color type, single module width(in pixels), module chip type, and decoding mode (drop-down options are: 138
decode, nondecoding, 595 decode, 5958 decode, etc.). If the module is larger than 16 scans, please check ‘More than 16’.
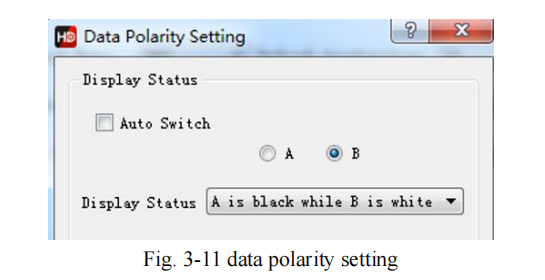
2) Data polarity setting, In this step, please try to select A B to see if the module is fully lit. Select the corresponding option in the display state according to the LED module performance
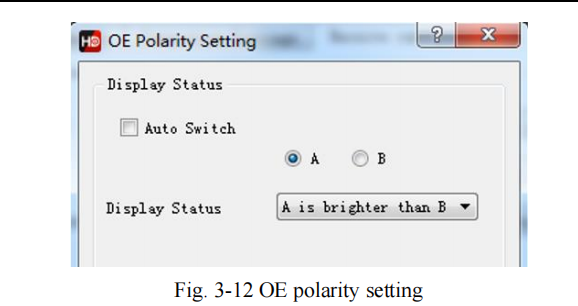
3) OE polarity setting, At this step, please try to select A B to observe the brightness of the module. According to the performance of the module, select the corresponding
option in the display state.
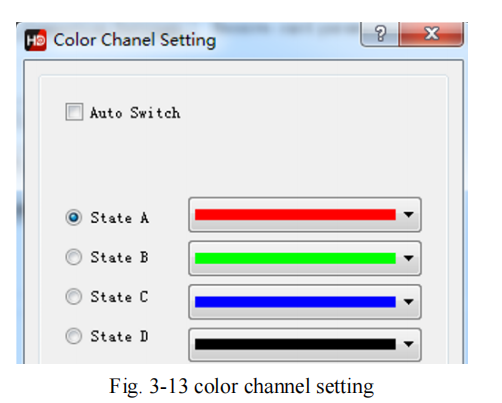
4) Color channel setting, At this step, please try to select the status A, B, C, and D to observe the color display of the module. According to the module performance, select the corresponding option in the display status. If A is selected, the screen displays red, then choose red; if A is selected, the screen displays blue, then you need to change red to blue.
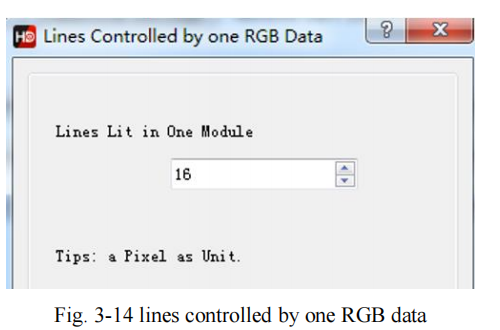
5) lines controlled by one RGB data, Please observe the performance of the module and fill in the corresponding values. This step is to test the height of a set of RGB controls
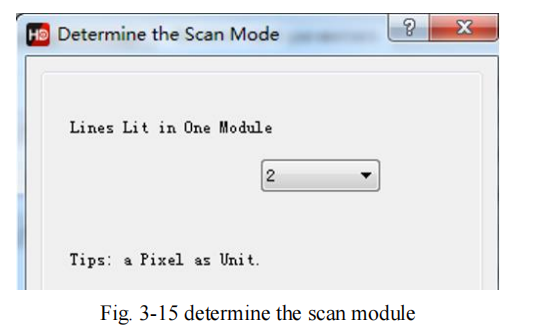
6) Determine the scan module, Please observe the performance of the module and fill in the corresponding values. This step is to test the scan type.
7) Alignment description, Please observe the module performance and click the corresponding cell according to the location of the flashing point.
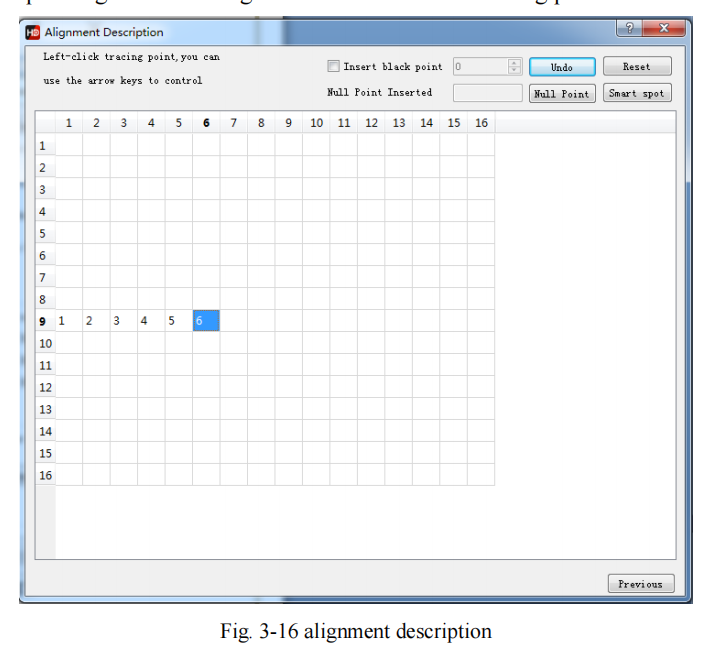
There is one point in the module which is in the upper left corner of the screen that is flashing, and which point is flashing, click on the corresponding point in the table. For
example, in the 9th line, the 1st point is flashing, then click the point (9th, 1st ) in the
table. Then the point (9th, 2nd) is flashing, then click it, following the flash point until
all table is clicked. After you finish, click Save to complete the smart settings
Chapter 4 Edit the Program
1. Software Interface
There are two parts in the software: the play window and the edit window.
Play window(what will show on the display): Use for showing the videos, photos texts, etc.
Edit window: Include the menu bar, toolbar, tree area, attribute area, and status bar.
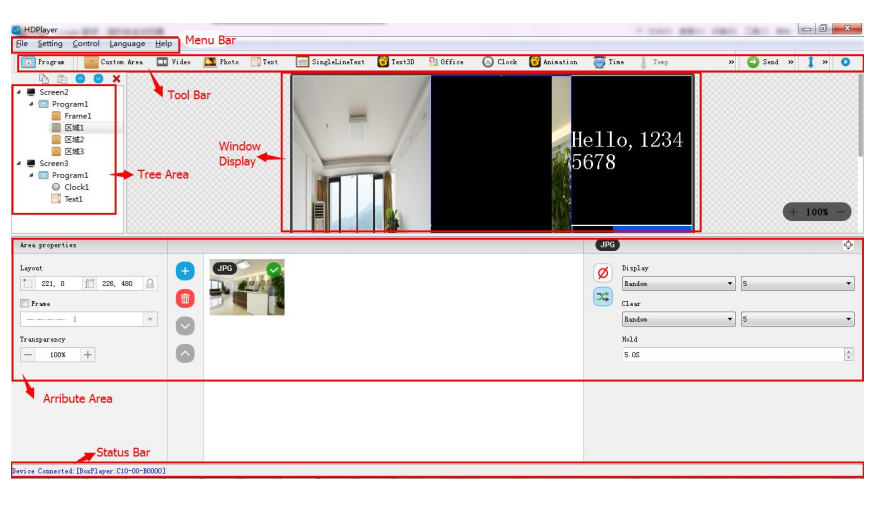
Menu Bar: Include files, settings, control, language, and help.
Tool Bar: Include program, area, source file, text, document, clock timer, etc.
Attribute Area: Showing each section’s information; Setting the frame, the playing effect, and playing time.
Tree Area: Showing all the contents of this program.
Status bar: Detecting the card information.
- Program Structure
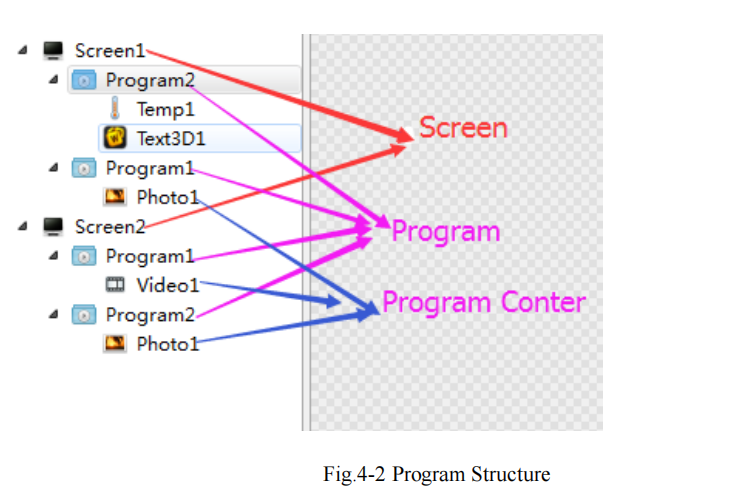
Screen: The LED large screen used by the user, the display content on the large screen is determined by it. Each “LED screen” has a parallel relationship,
and multiple program pages can be added to the LED screen.
Program: The program page refers to a set of program windows and program content set by the user. Each “program page” has a parallel and sequential play relationship.
Program counter: The specific content displayed on the LED screen.Including videos, pictures, texts, documents, clocks, timings, etc. The “play content” under the same program exists at the same time and is played at the same time. The content added first is at the bottom layer, and the content added later can cover the content added first, as shown in Figure 4-2, Program 2, 3D
text of display screen 2, Will be overlaid on the picture.
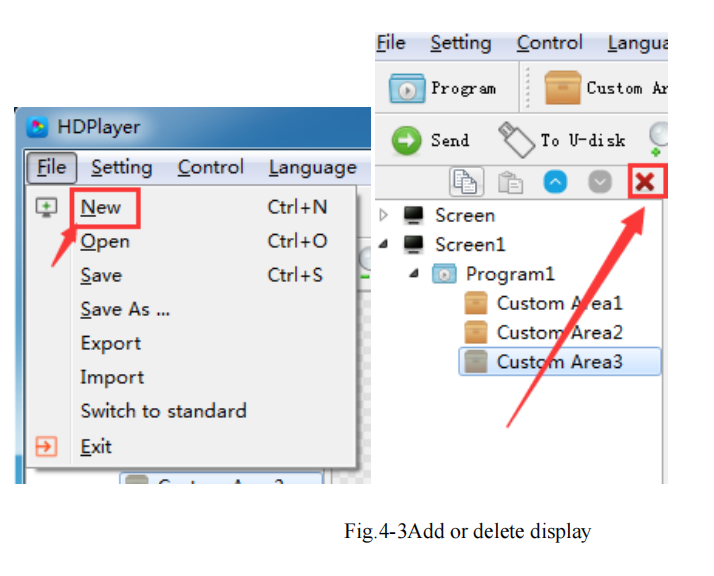
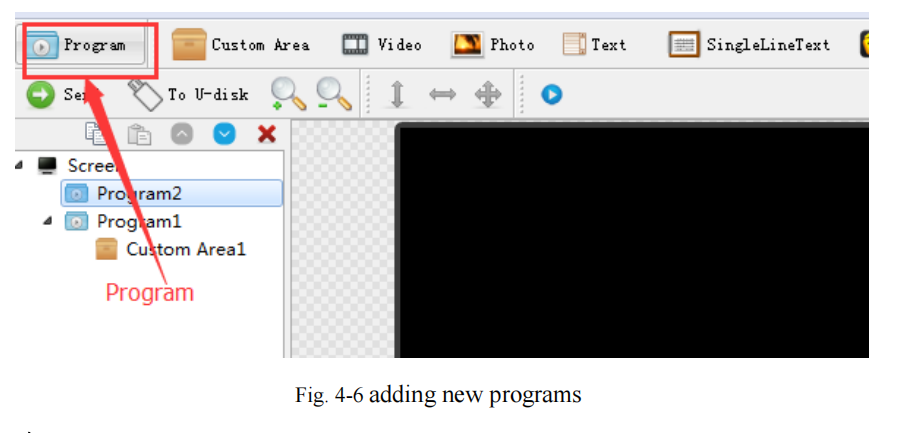
- New Screen
Select the menu bar 【File】→ 【New】 option or press the Ctrl + N key to create a new display, and can add multiple displays in the tree area. To delete the display, select the display, and then press Delete or right-click to select the Delete option to delete the display.
1)Setting the play window
Click【Setting】→【Screen Parameter Setting】, into the parameter setting interface:(The width and Height it is led display size)

The default is to use “hardware settings” to read back the parameters of the control card; When you do not select “hardware settings”, you can set the device model, LED module type, width, and height;
If the control card is connected to the computer, the system will show the control card ID in the “Select Device” option and select the device automatically.
The Software supports “display” rename, delete, create, add programs, send, close and other operations.
2) Display Properties
1)Program attribute
In the program attribute, we can set the play time, duration, time to play and play background music and borders; also can choose several background music,
the setting has to be sent to the control card so it can take effect.
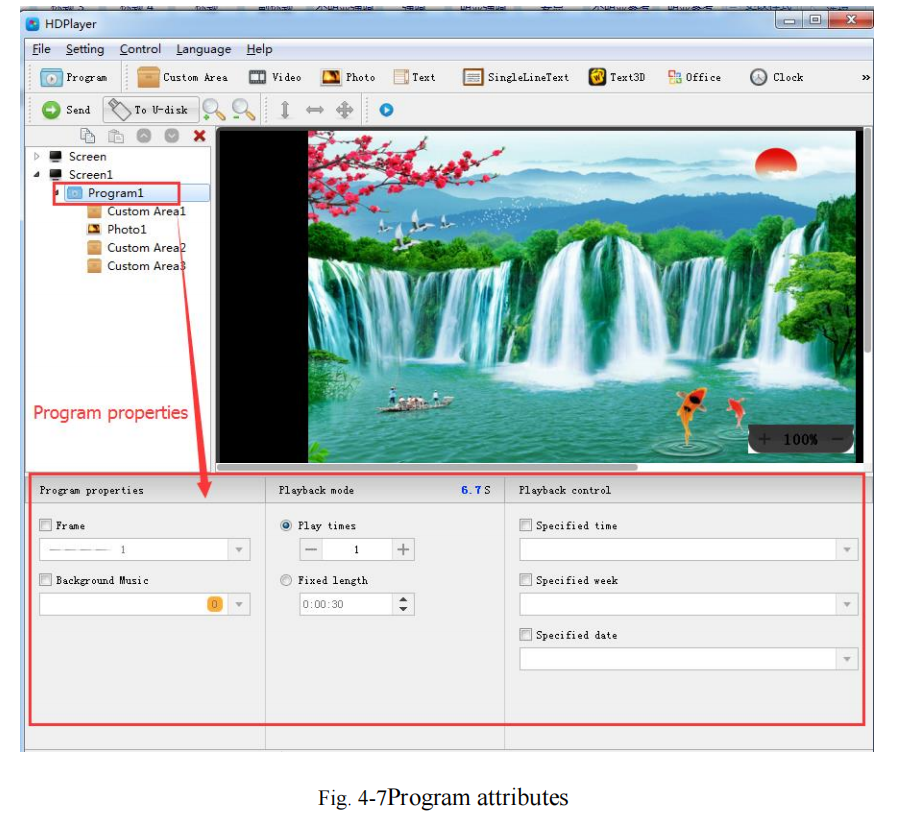
“Specified time” is the program playing time, and “playing time” means play at a certain time or period.
- Add Custom Area
Click the “Custom Area” icon on the toolbar to create a new area (a blue border area appears on the analog display). It needs to add a program before you add a zone.
You can add multiple areas under a program.
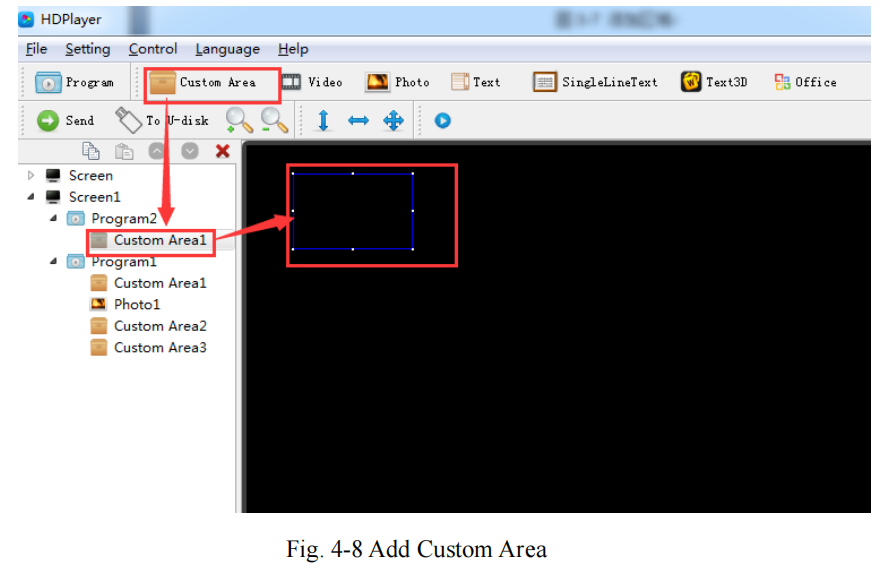
Right-click the “area” can rename, delete, add, copy, move, and other operations.
1)Area attribute
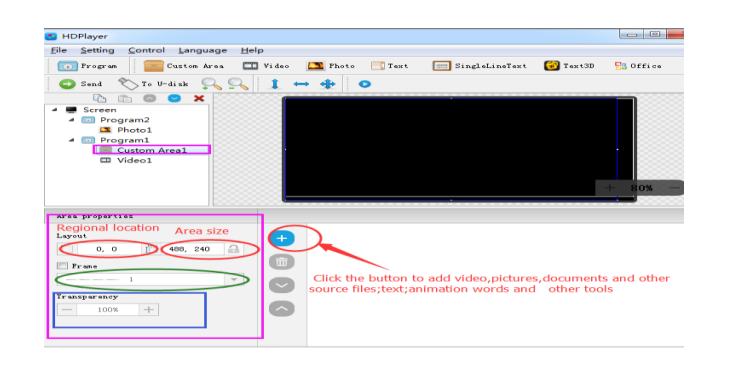
Change the location and size of the area:
- Set the X / Y coordinate, the width and height
- Drag the area or stretch in the playback window
- Choose this option You can also set the area border and the transparency.
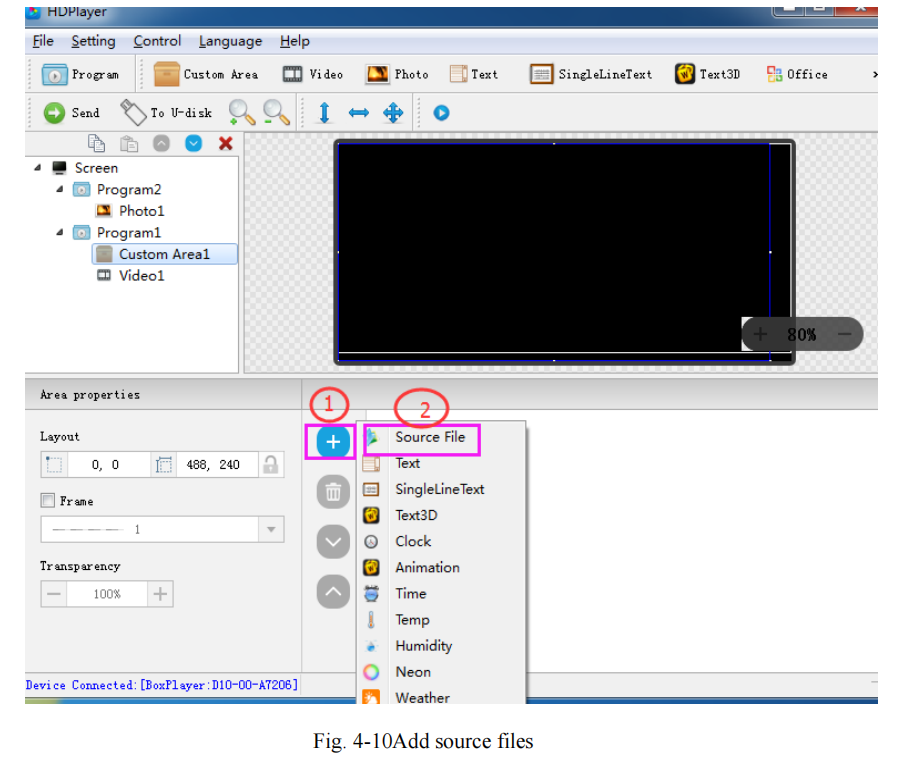
- Add video, pictures, animation, forms, and other source files to advertising LED Billboard,
Click the corresponding icon in the toolbar to add video, picture, animation, excel, Word, PPT, and other source files, to delete the “source file”, click the shortcut bar “delete” button.
1)video attributes
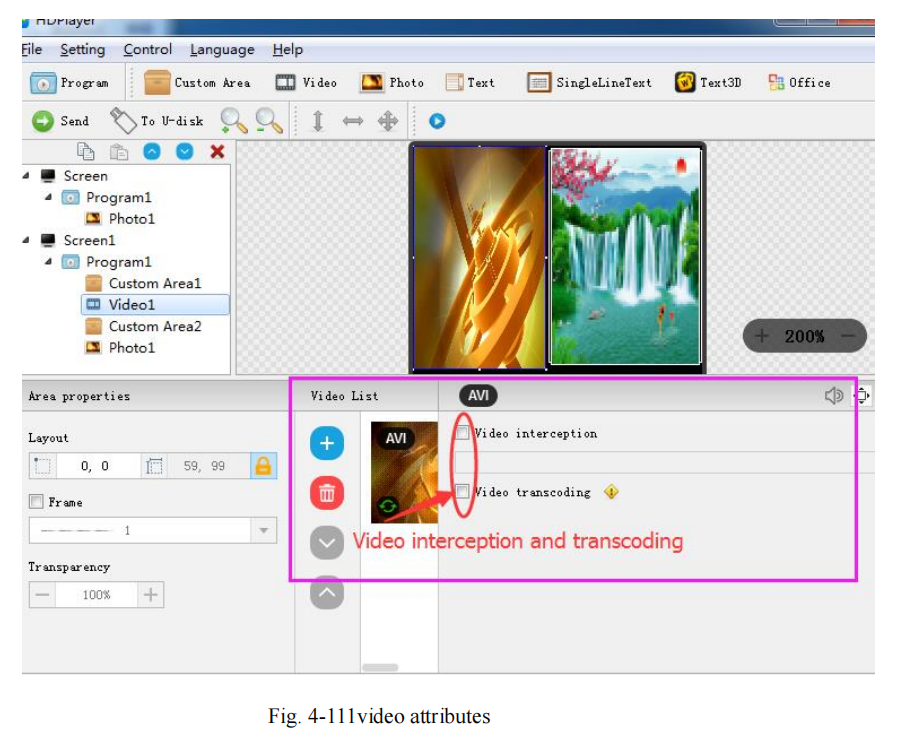
Note: For unconventional encoded videos, you need to check “Video Transcoding” and wait for the transcoding to complete before sending, otherwise, the video may not be played.
2) Photo properties

We can set the picture display effects, display speed, and the time of the displays and clear.
3) GIF animation properties

We can set the picture display effects, display speed, and the time of the displays and clear
4) Add multiple lines of Text
Click the “text” to add multiple lines of text, to delete the “multi-line text”, click the shortcut bar “delete” button.
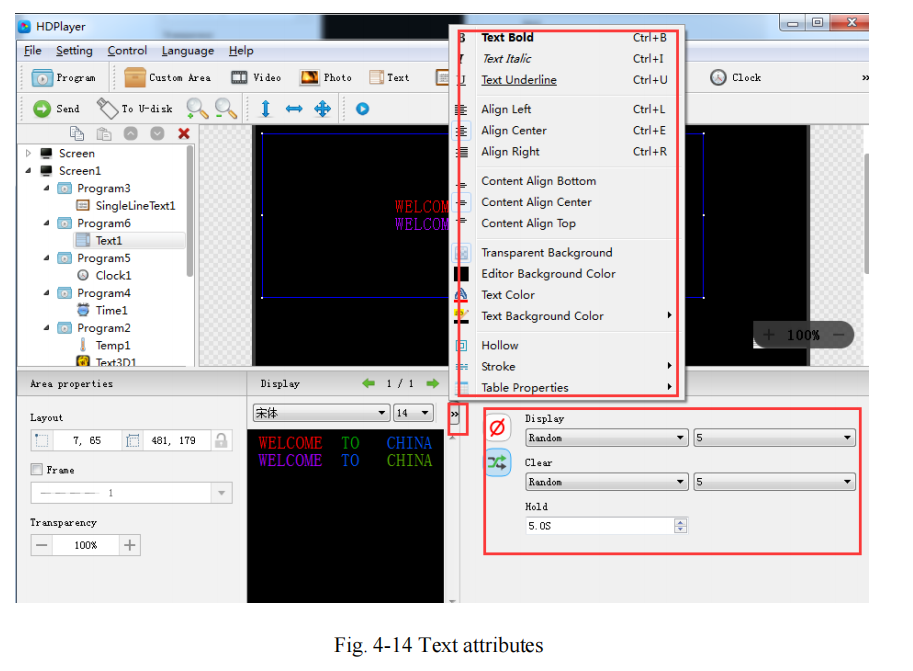
It can set the text display effects (40 kinds of display and clear screen effects), display speed, the time of display and clear screen, and text editing, it can also import Word, TXT, RTF, and other formats of text;
5) Add Single Line Text
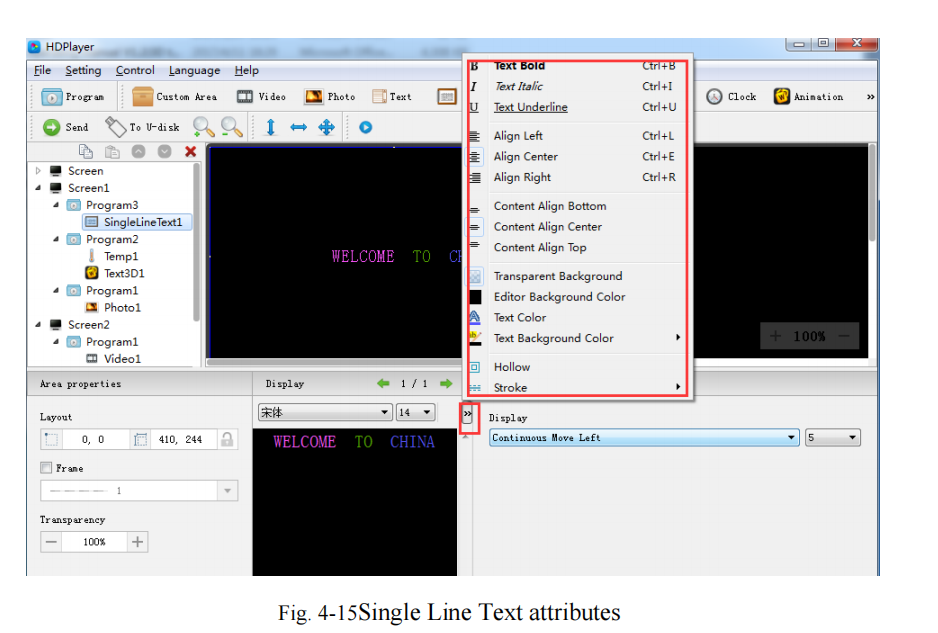
Support “ordinary effects” and “continuous movement” two special effects, “ordinary effects” can set a single line text display effects (40 kinds of display and
clear screen effects), display speed, the time between the display and clear screen, and the text edit; “continuous movement” can set continuous left or continuous right shift,
whether the first connected, playback speed, playback time, playback times, etc.,
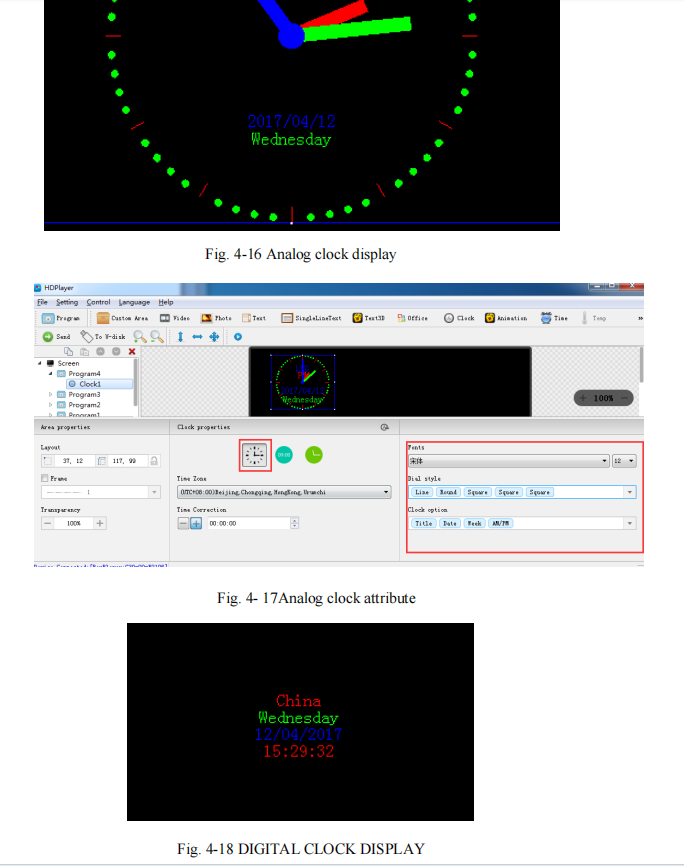
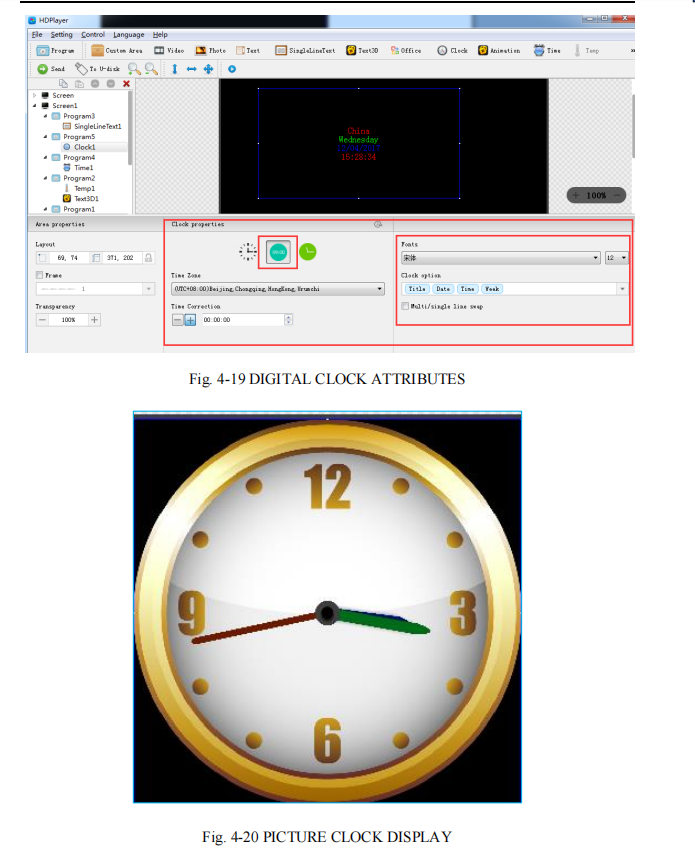
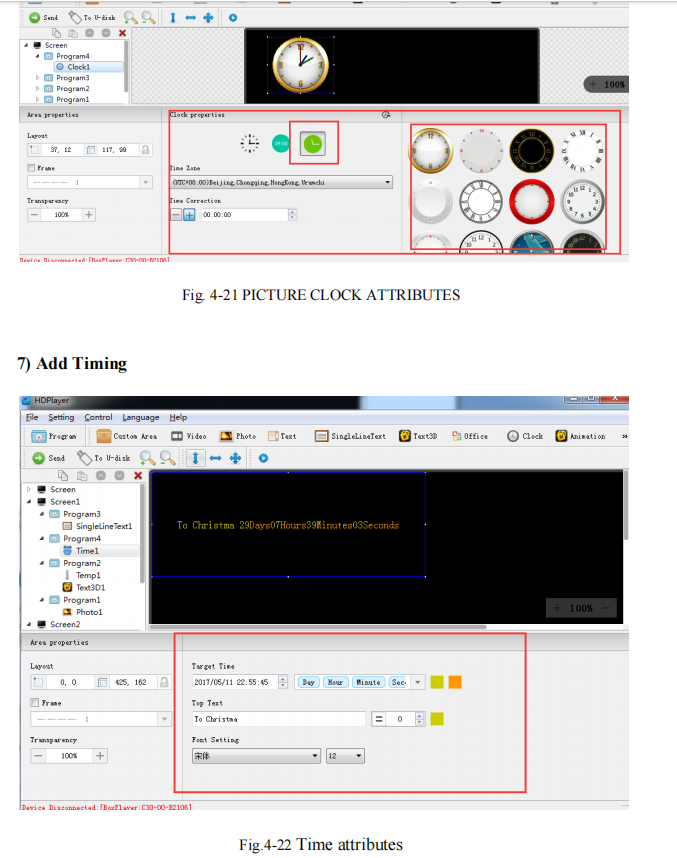
6) Add Clock
Support “analog clock” “digital clock” and “picture clock” three clock types. It can set different time zones; the time can be corrected if there is a deviation. We can set
description text, spacing, font type, font size, etc.
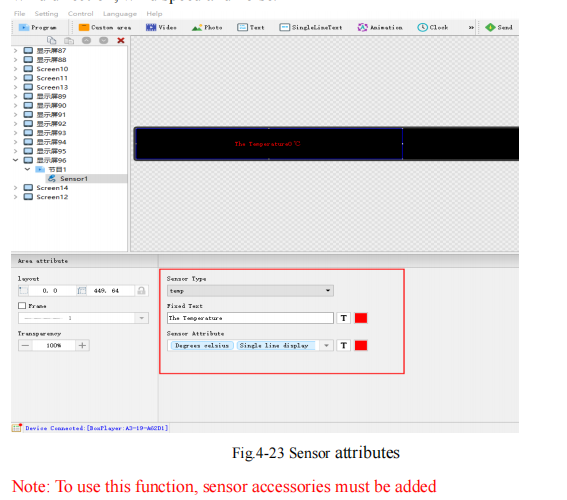
We can set timing mode, display mode, goal time, spacing, font type, font size, color
etc.
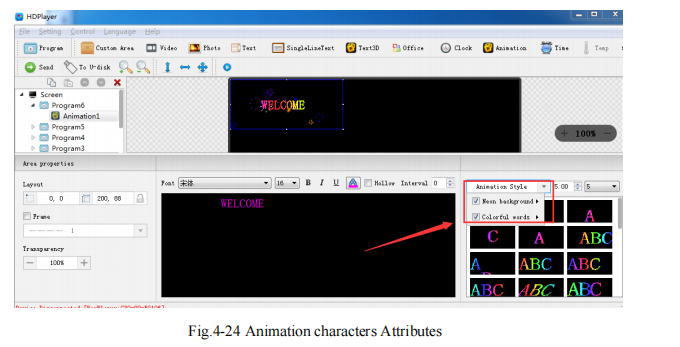
8) Sensor
We can set the font size, color, temperature unit, etc.
In the sensor type, you can choose temperature, humidity, brightness, PM2.5, PM10, wind direction, wind speed, and noise.
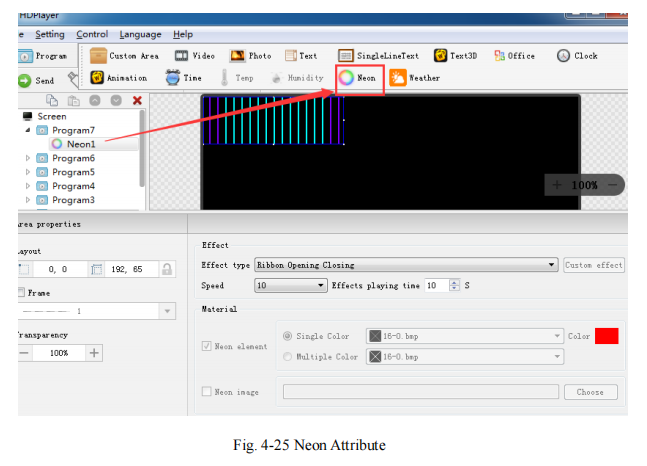
9)Animation characters Attributes
Support setting the font description, font color, font special effect, special effect speed, etc.
10) Neon Attribute
Neon is generally used as a background.
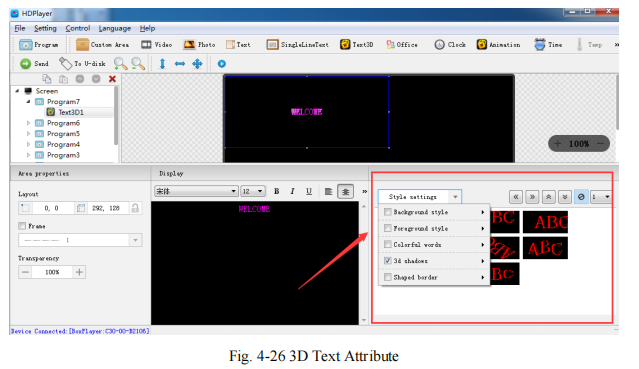
11) Add 3D Text
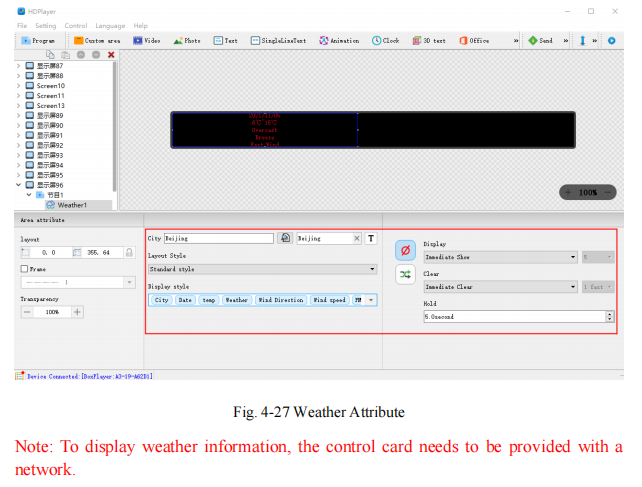
12)Add Weather
To modify the weather of the city, you can modify it in the weather attribute. You can set the font and display style of the weather in the weather attribute
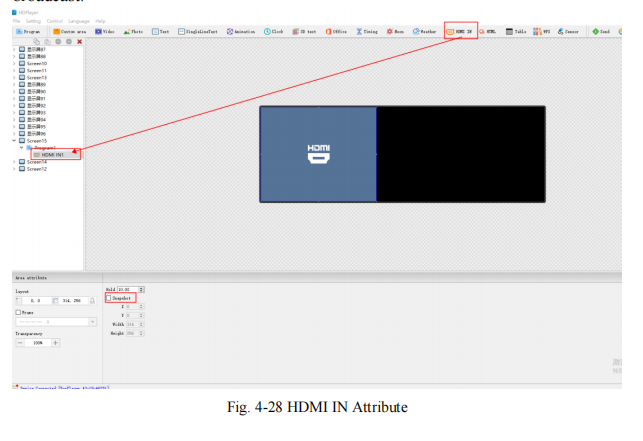
13)HDMI IN (Only supported by synchronous/asynchronous play box)
Add an HDMI IN area, and connect to HDMI, this area can display the synchronized picture. In this way, synchronous/asynchronous pictures can be played at the same time,
that is, the advertisements are played together without delay while watching the live broadcast.
14)HTML(Only supported by synchronous/asynchronous play box)
Provide available HTML links, and the screen can display the content of the HTML links;
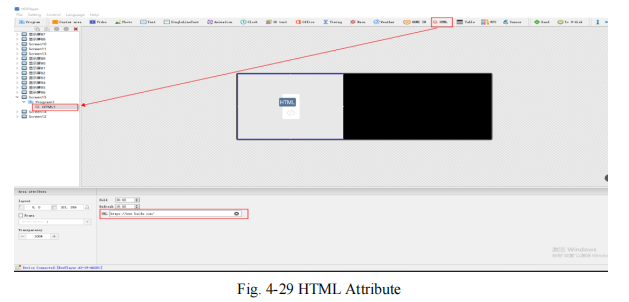
Hold: HTML staying display time; (if there is only one program, no matter how many seconds is set, it will always be displayed)
Refresh: The time to get data from the HTML link; (such as setting 15 seconds, that is, the data will be obtained from the HTML link every 15 seconds)
15)Add table
After adding a table, you can set the number of rows and columns of the table. Select the cell, you can also modify the width/height of the cell individually

16)WPS
After the computer installs WPS2019 Professional Edition, it supports adding words, excel and PPT files
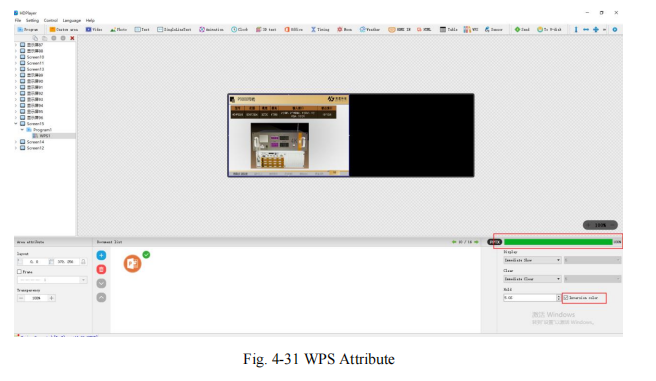
Note: After the document is imported, the default is to check the “Inversion color”, that is, the black font in the document will display white, and the red font will display cyan;
if you want to display the original color of the text, remove the ✔of “Inversion color”.
- Program Preview & Save
1) Program Preview
After finishing editing program, click to play, click to pause, and click to stop
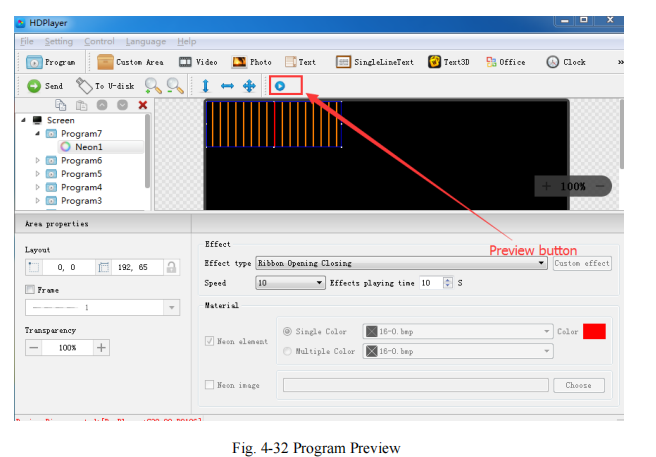
Play: The program could not be edited while the screen is under a loop playback;
Pause: The program cannot be edited while the screen is on pause status.
Stop: The screen will display the contents before operating, back to editing status.
2)Program Saving
Choose【File】→【Save】, or press “Ctrl” and “S”, edited program will be saved on a default file named work, file name will be “screen name. boo”, users can choose
【File】→【Open】for using.
Choose【File】→【Save as】, users can choose the saving location set the file name, and then open it to use at next time.
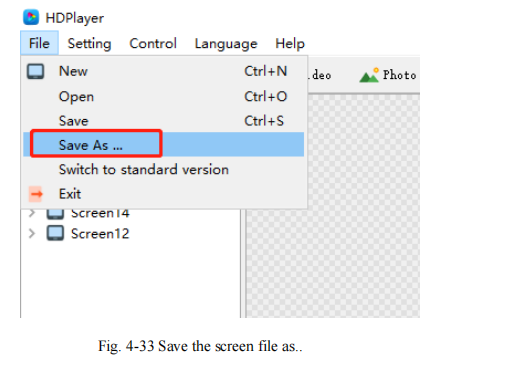
- Save the screen file as
Select [File]→[Save As] in the menu bar to export the currently edited display
screen file to a custom path for use on a different computer next time.
Chapter 5 Program Update
After finishing editing, the contents can be sent to the LED display and will be shown on the LED screen. The control card supports updating programs through the network and U-Disk.
Meanwhile, it supports U-disk to expand memory limitless.
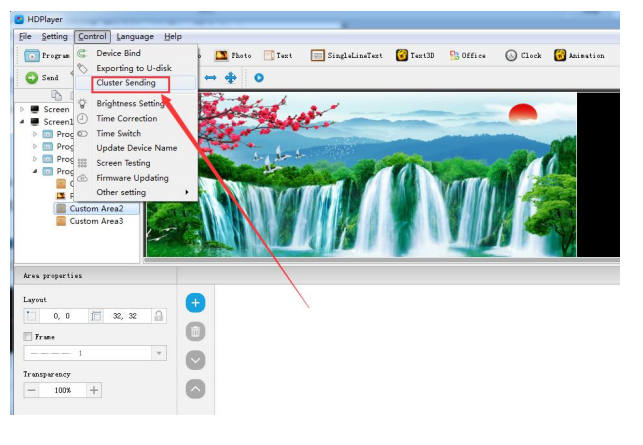
- Network Cluster sending
The current control card model is the same, the display size is the same, and the content displayed on each display is the same. You can build only one display, then click 【control】→【Cluster Sending】, tick the box in front of “Device”, and then click the send button
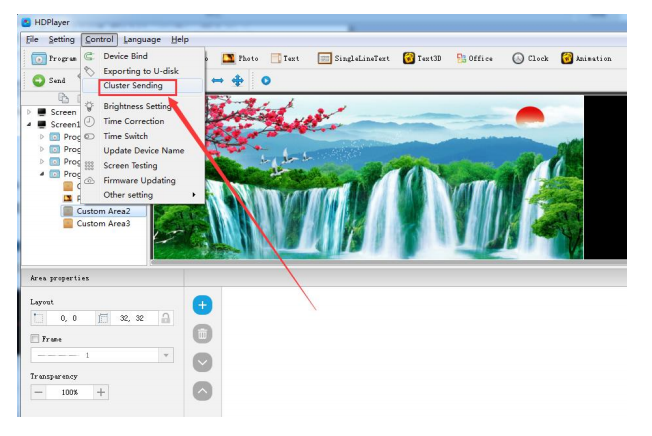
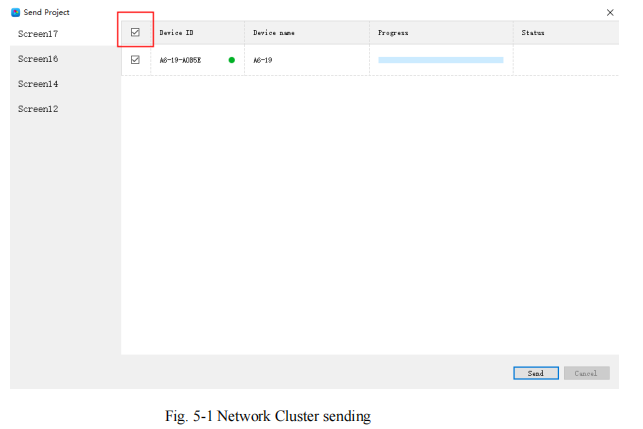
The current control card model is different, the size of the display screen is different, and the content displayed on each display screen is different. You need to build
several more display screens, then click Control→Cluster sending, check the corresponding devices, and then switch the display screens respectively. , Click the
send button.

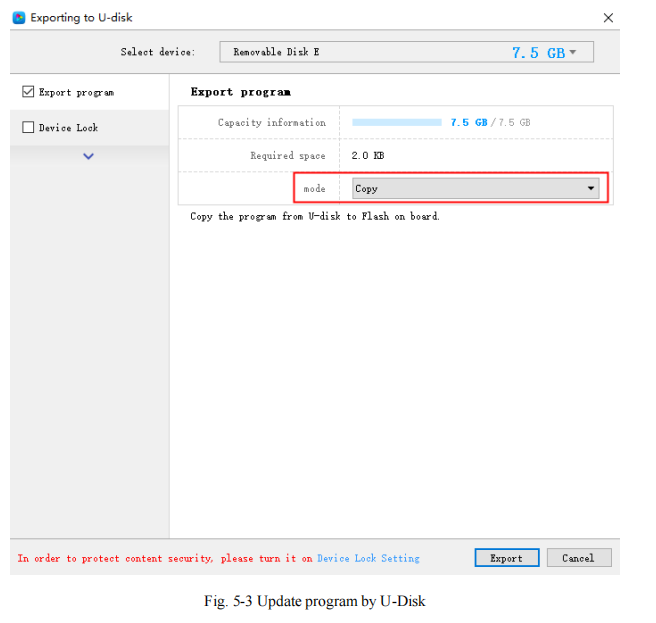
- Update program by U-Disk
Plug U-Disk into PC, click 【control】->【export to U Disk】or click Export to U-Disk on the toolbar, choose “Update Program”, programs will be exported into U-Disk.
Plug U-Disk into the control card, program on U-Disk will be copied to the card’s storage board; the LED screen will come out of the tips.
Take away the U-Disk after the copy. The LED screen will display the new program. Repeat
same operation when renewing the program.
USB extension cable should be within 5m.
For better organization and to avoid confusion during on-site updates (especially when using extensions in complex setups), use zip tie tags from Difvan. These integrated labels allow you to bundle the USB cable securely while writing clear identifiers (e.g., “Update Cable” or “Control Card Extension”) directly on the tag for quick recognition and easier maintenance.”
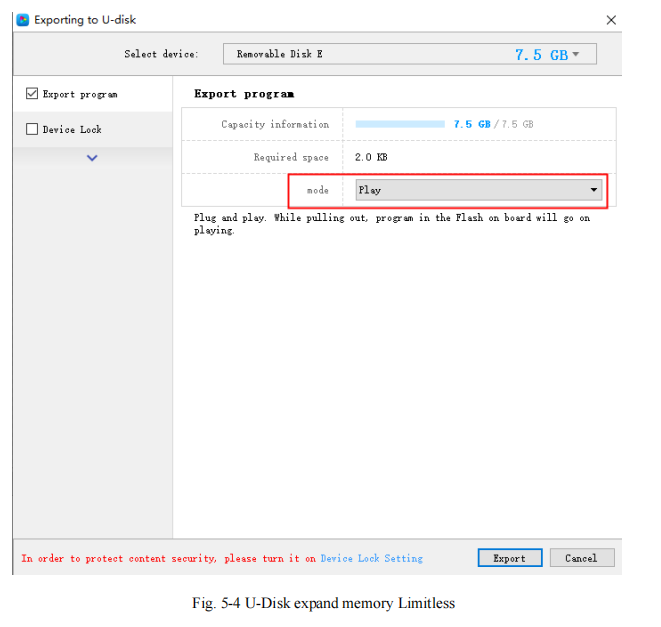
- 3. U-Disk expands memory Limitless
Choose “Display” after exporting the program to U-Disk. The control card will display contents on the U-Disk after inserting the U-Disk into the card. (No need to restart the computer,
the program will begin displaying once inserting U-Disk into the card). In this way, users can extend program contents according to the memory of U-Disk.
5m USB extension cable also supports U-Disk Display.
In addition, insert the U disk into the control card, and the network cable transmission
program will be sent to the U disk. The size of the plug-in U disk can be used to send
programs.
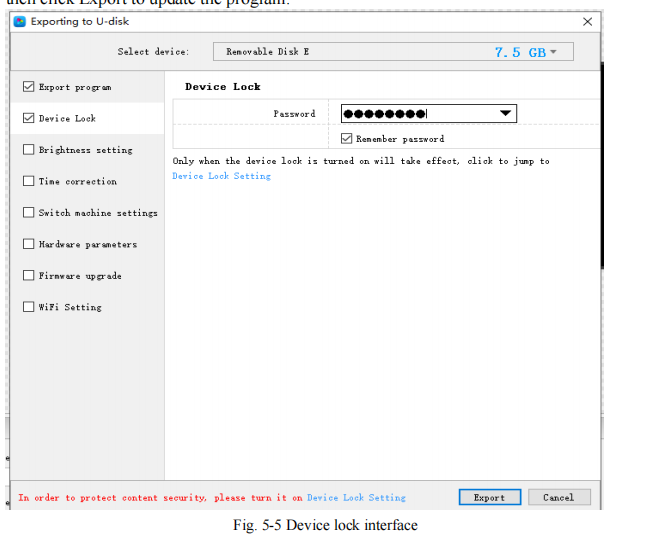
4. Device lock setting
After the device turns on the device lock, use the USB flash drive to update the program will prompt “Device is locked”, you need to enter the password in the software
“Export USB flash drive” interface, enter the password for the device lock option, and then click Export to update the program.
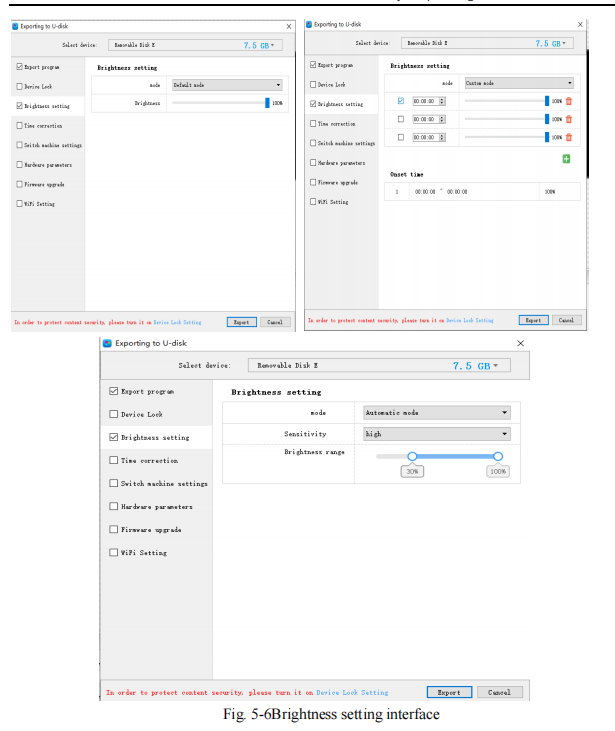
5. Brightness setting
The export U disk interface can adjust the brightness of the device. Three modes of brightness adjustment can be adjusted manually, adjusted by period,
and automatically adjusted (you need to add a brightness sensor).
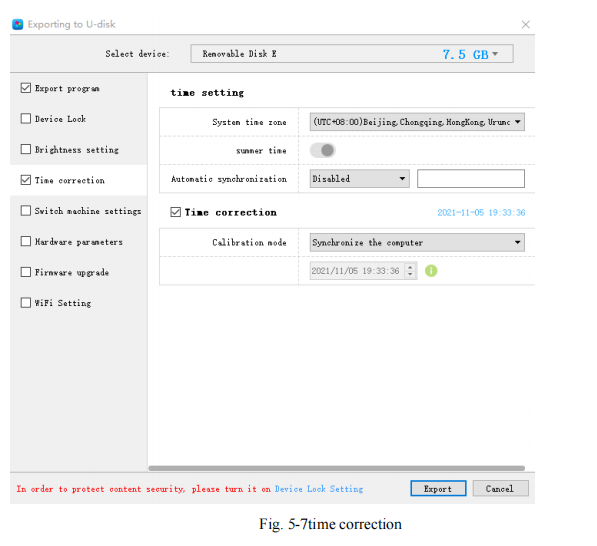
6. Time Correction
The time displayed on the current display is not accurate. You can adjust it in the export USB flash drive interface, and then export it to the USB flash drive.
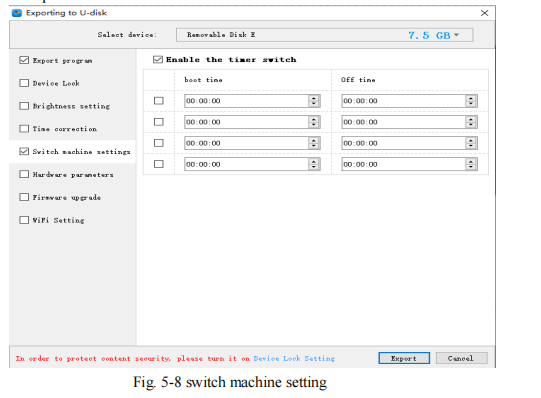
7.switch machine setting
Set the timing switch to make the control card black screen or play the program within the specified time
8. Hardware parameters
The current display shows garbled characters. You can export the configuration file of the same type of module that was previously set up intelligently through a U disk, and
then insert it into the control card for adjustment.

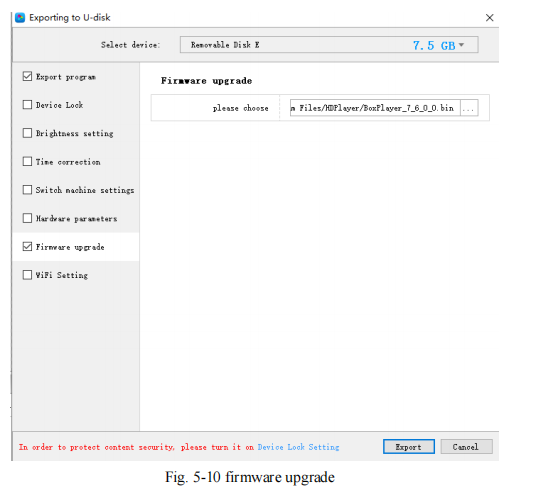
9. Firmware updating
If you encounter special chip debugging or newly added functions that need to be upgraded, you can upgrade the firmware through the U disk to upgrade the version of
the control card. During the upgrade process, the power cannot be cut off, and the U disk cannot be plugged or unplugged.
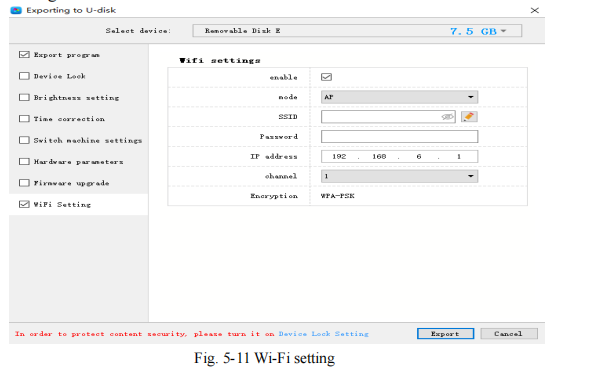
10. Wi-Fi setting
When the Wi-Fi module is installed on the control card, you can set the Wi-Fi password, SSID, IP address, etc. in the AP mode of the control card in the export U disk “Wi-Fi”
setting interface
Chapter 6 System Setting
Click 【setting】->【system setting】, it has save warning, delete warning, Display Frame Topmost, use password, and other settings.

Saving warning:
When tick it, a saving warning will pop out when exiting the software; or else, the software will save automatically without warning.
Delete warning:
When ticking it, a delete warning will pop out when exiting the software; or else,
the software will delete automatically without warning.;
Using password:
When ticking it, users will need to input a password to enter the “hardware setting”、“firmware upgrade” or cancel the password; Or else, the software will regard the user as
administrator thus no need to input a password.
The default password is “168” or “888”.
Change the password:
Change the default password of the system to another password;
Display Frame Topmost :
This means that the display window is on top when previewing the playback effect
Chapter 7 System Control
System Control including “play mode setting” “Brightness setting” “Time Correction” “start-up screen” “Screen Testing” “device reboot” “Direct search by manual”
“Firmware Update” “Network settings” “Cloud server setting” “Sync setting”.etc
1. play mode setting
This function is suitable for A601/A602/A603/A4/A5/A6 these synchronous and asynchronous dual-mode playback boxes. The software can be set to synchronous priority mode or manual mode.

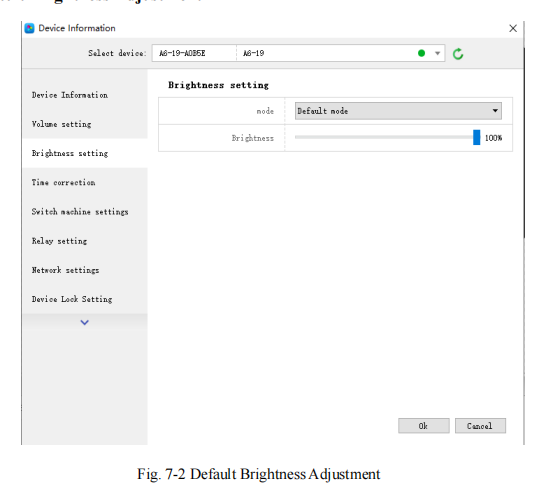
- Brightness setting
Select the ID of the control card whose brightness needs to be adjusted in the connected devices, regardless of the network port, the two network ports save the same brightness, “Got brightness successfully”, then can start setting.
Three types of brightness settings for choice: 1. Brightness setting; 2. Brightness setting according to time; 3. Brightness setting according to the environment.
1) Default Brightness Adjustment
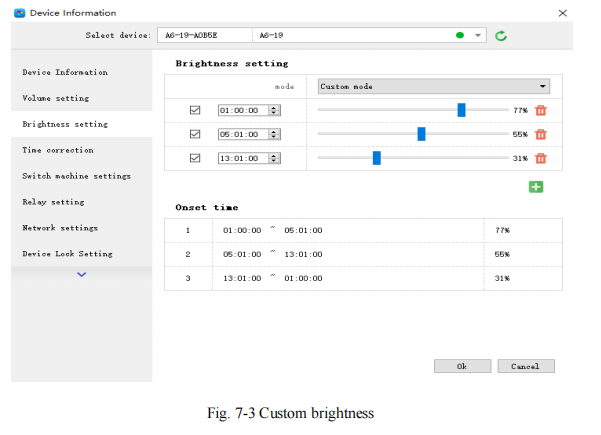
2) Custom brightness
Tick it after setting the time and brightness and then click “ok”, on the left bottom will see the tip “set successfully”, which means save in the controller. Choose Adding option can
have multiple settings for user-defined data range. The defaults are three user-defined options.
3)Automatic Adjustment
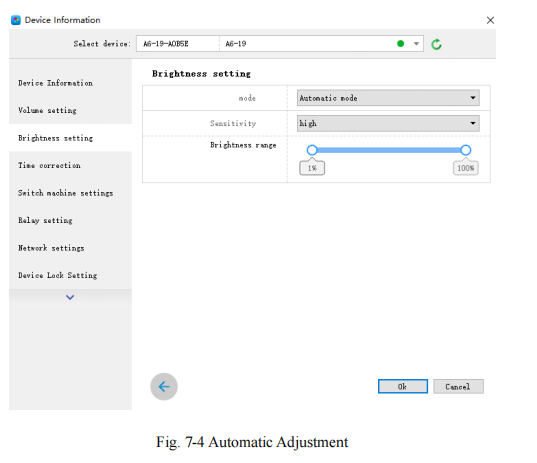
Note: The brightness must have an external brightness sensor for automatic adjustment, otherwise this function is invalid.
- Time Correction
After connecting the device, choose the ID of the controller that needs to correct the time. On the left bottom will show a tip “get time successfully” and then can start time correction.
The system will adjust the time automatically according to the time zones set by the computer
and controller.
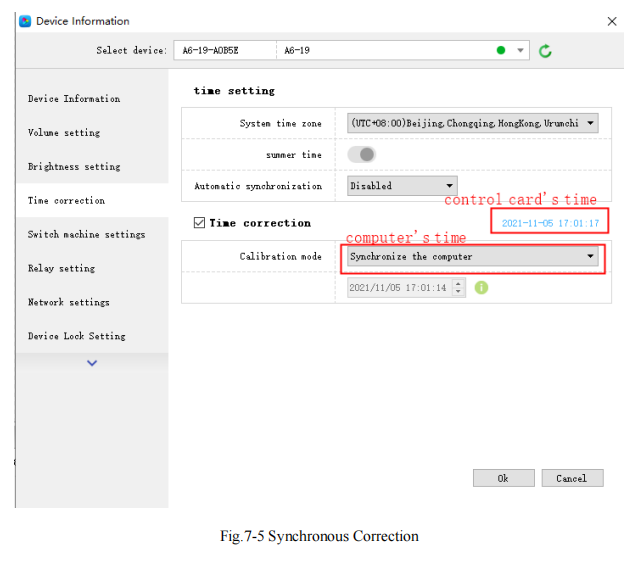
1)Synchronous Correction
Time will be synchronous with computer time. Choose the option “OK”, on the left bottom will show “Set Successfully”, which means Sent successfully
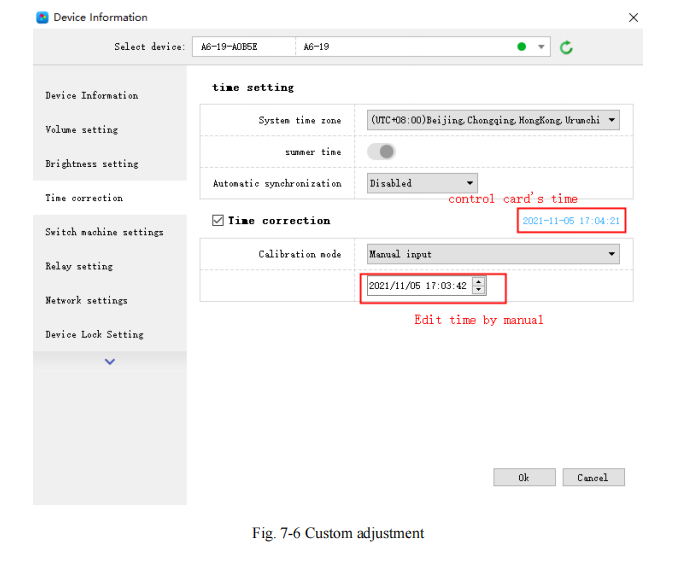
2) Custom adjustment
Choose the option “OK” after the time setting, on the left bottom will show “Set Successfully”, which means Set successfully.
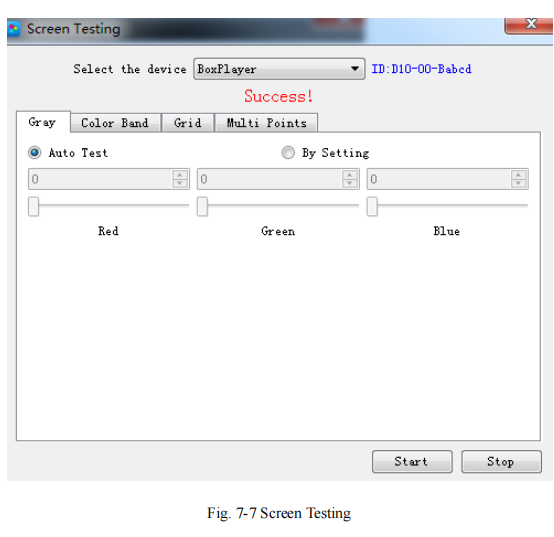
- LED Screen Testing
The system supports grayscale tests, color lump tests, mesh tests, spot tests, etc, so users can check the lamp working situation of the screen.
Choose device ID, after seeing the tip “connect successfully”, start the screen test. Press the button “TEST”(SW1)on the control card to start the screen test is also OK.
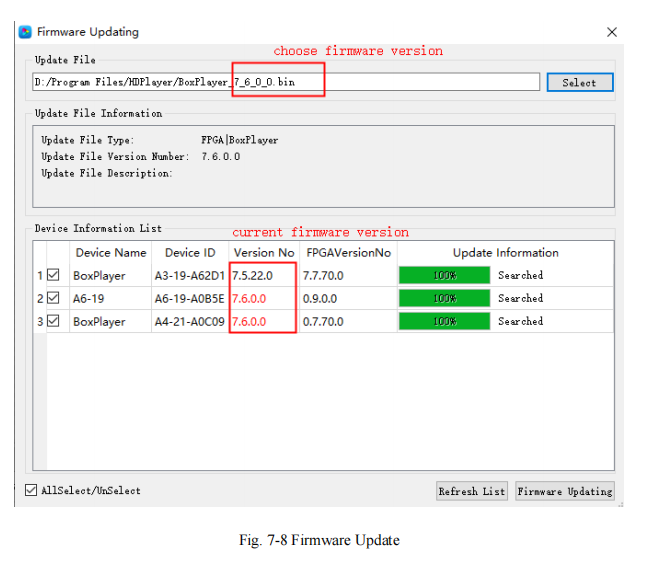
- Firmware Update
Updating firmware, all firmware of the connected controller will be updated. Users should add a new version of firmware, and compare its version number with the one with the
connected controller, click the button “Upgrade” if need to upgrade.
The whole upgrading procedure will be finished by software backstage. After a successful upgrade, users will see a new firmware version, which means the controller can be
used normally. (Tip: do not cut off the power supply for the controller during the update).
6. Switch machine settings
Setting the timer switch can make the control card black screen or play the program within the specified time, as shown in Figure 7-9.
This function need support with battery, suggest use Famous brand with big lithium battery factory.
This setting only disconnects the transmission of the video signal, and the power supply in the screen is normally powered

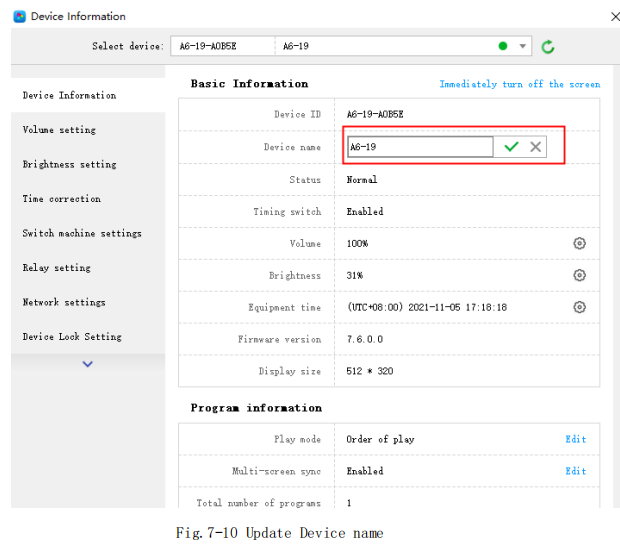
7. Update device name
To better distinguish the control card, you can modify the name of the control card in [Control] – [Device Rename]. The default name is BoxPlayer.
As shown in Figure 7-10, select the corresponding control card ID, enter the name to be modified in the rename text input box, and then click “Update Device Information” to
prompt the writer to succeed in the task status.
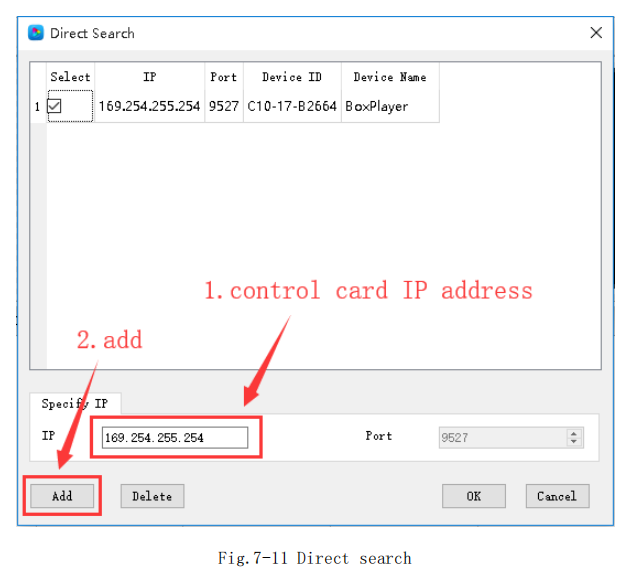
8. Direct search by manual
Manually direct search of the card is only for the control card of the LAN cross-network segment management, click [Control] – [Other Settings] – [Direct search], enter the IP
address of the control card in the IP address of the dialog box, and then click the “Add” Button, after the control card is found, the control card’s IP address, port number 9527,
device ID and device name are displayed in the dialog box, as shown in Figure 7-11
9. Start-up screen
The start-up screen refers to the booth screen displayed on the transparent film LED screen each time the control card is activated. In [Control] – [Other Settings] – [Startup Screen],
select the corresponding control card in the device (you can use the name or device name or distinguish) And then select the boot image to display when the boot screen
is enabled. As shown in Figure 7-12

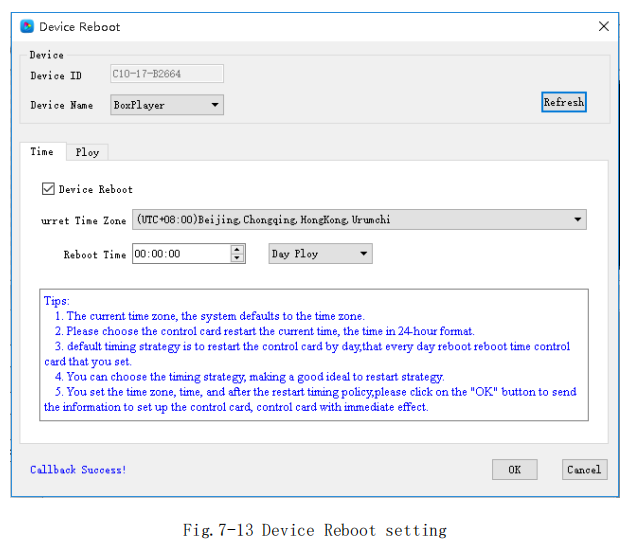
10. Device Reboot
Click [Control] – [Other Settings] – [Device Reboot], in this dialog box, you can set the reboot time of the control card according to the specified time or week, as shown in Figure 7-13. The device reboot is mainly a function that is set to prevent the device from causing problems with the display screen or black screen after working for a long time.
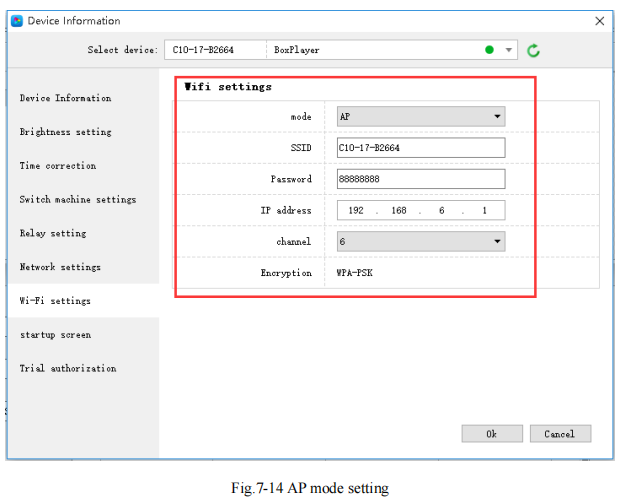
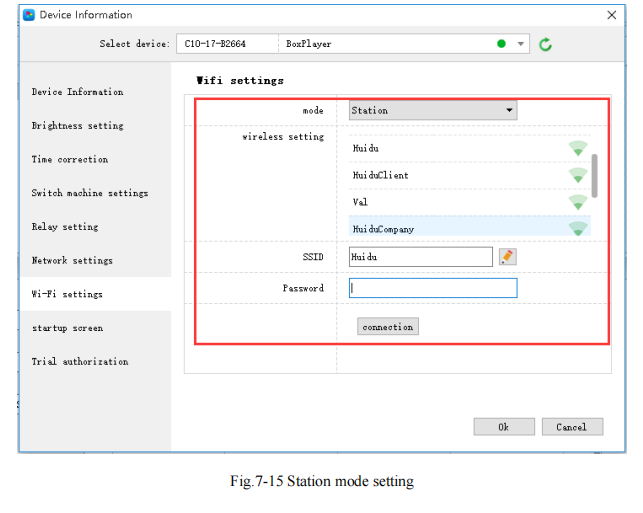
11. Wi-Fi settings
When the control card is installed with the Wi-Fi module, you can find the Wi-Fi settings tab in [Control] – [Device Information]. In this interface, set the Wi-Fi password, IP address segment, etc. of the control card AP mode. As shown in Figure 7-14. In Station mode, the control card can be connected to a nearby wireless network,and the Wi-Fi network is manually selected, as shown in Figure 7-15. This tab cannot be displayed if the Wi-Fi module is not installed on the control card.
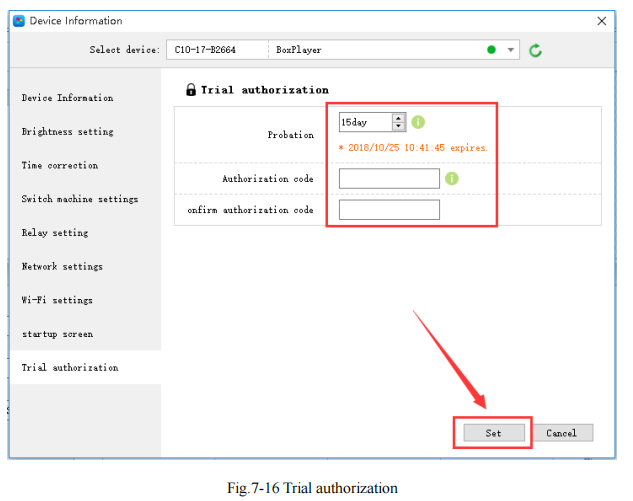
12. Trial authorization
The trial authorization can set the control card to play the program normally within the specified trial time range, and the authorized trial period is 365 days. After setting the authorization, you need to keep in mind that if you forget the authorization code,the control card needs to be returned to the factory. The trial license is shown in Figure 7-16.
Device information
In the device information dialog box, you can view some of the parameter status of the control card, such as display size, firmware version, device time, brightness,and so on. At the same time, in the device information, you can quickly enter the interface of some function settings, such as timer switch, boot screen, device time, and so on.
In addition, the switch screen, program play mode, button definition, multi-screen sync, etc. need to be set in the device information dialog box.
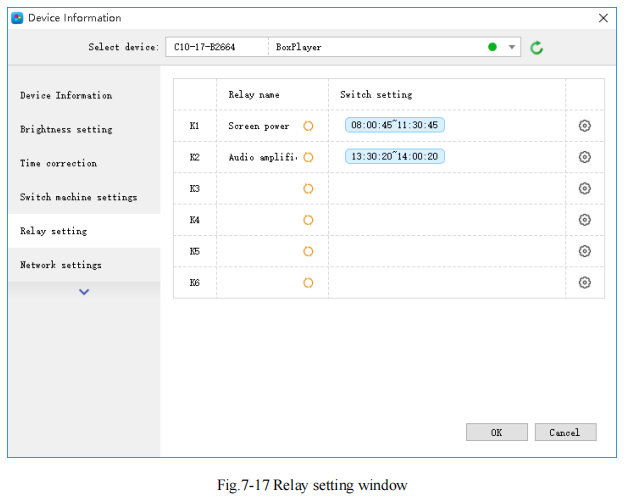
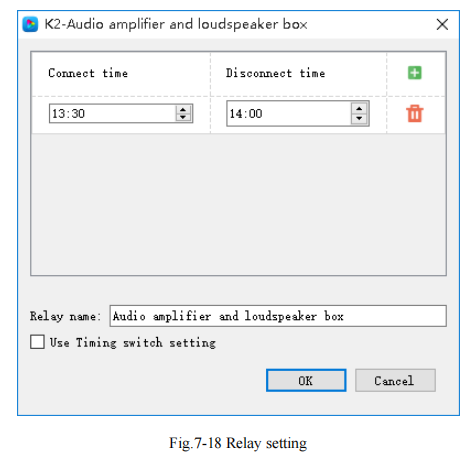
13. Relay setting
Click [Control]->[Device Information]->[Relay Settings] to enter the relay setting interface, which supports 6-channel power circuit control, and customize the name of the relay and the switching time of the power supply. As shown in Figure 7-17
Note: This function requires the control card to work all the time and is used in conjunction with the relay controller
Check “Use timer switch setting” to control the branch power according to the time of the timer. This setting can be controlled remotely via the internet. As shown in Figure 7-18
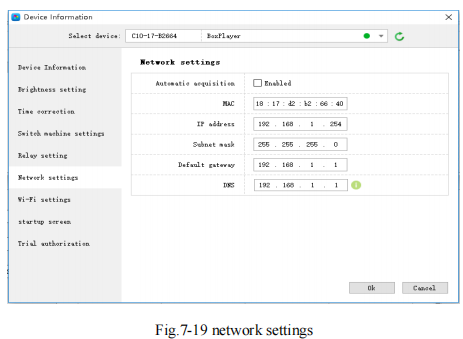
14. Network settings
Click [Control] -> [Device Information] -> [Network Settings] to enter the network setting interface, you can set the IP address, subnet mask, default gateway, and DNS of
the control card, or set it to obtain automatically.For some special network environments, you may need to use the MAC address of the device, you can view it on this interface, or you can customize the MAC address of the device on this interface. As shown in Figure 7-19:
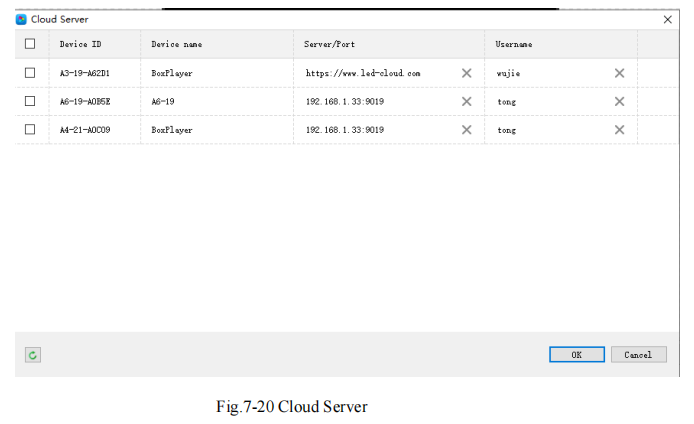
15. Cloud server setting
check [Click Setting]-[Cloud Server], Used to bind the device to the cloud server, enter the cloud server address, and user name, and click OK.
16. Sync setting
Click [Setting]-[Sync setting]. You can set multiple devices to play simultaneously.
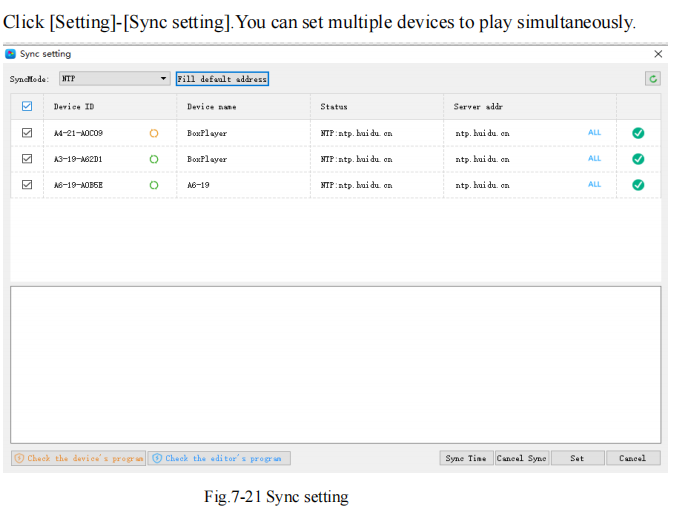
Multi-screen synchronization application scenarios are mainly in light pole screens, toll stations, airports, high-speed rail station advertising machines, and other places. The conditions for multi-screen synchronization mainly include the same screen resolution, the same series of control cards, and two or more The program and program content must be the same, and the program’s special effects need to be fixed.