
(1)Wire Preparation:
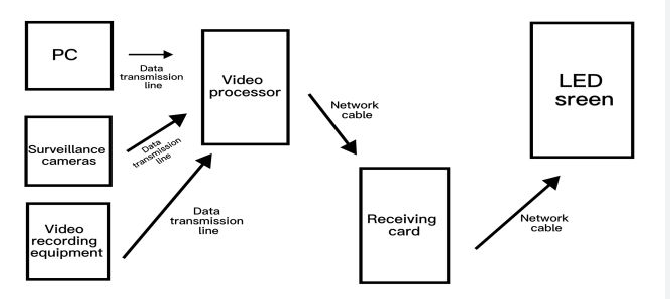
①Cat6 Ethernet cable, Processor to LED receiving card, maximum length ≤ 100 meters.
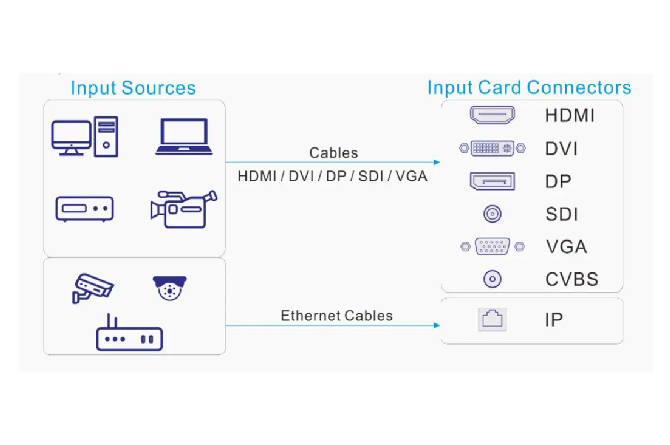
②HDMI and DVI cable input signal from computer and player.
③USB B Cable Square Connector to Essential for PC based screen debugging.
④Power cable for processor power.
⑤Power cables and ribbon cables for LED screen cabinets, screen units to be provided by the user.
(2)Connect the wiring in four groups, ensuring the correct sequence, connect the wires first, then apply power.
1.First power supply wiring:
①Plug the power cord into the power port on the rear panel of the processor and connect it to the mains power supply.
②The LED display cabinets require a separate power supply, it is recommended to connect the processor and the display cabinets to the same power strip to prevent screen flickering caused by synchronization issues.
2.Signal Source Input Video Source, INPUT Section:
①The INPUT port on the left side of the rear panel serves as the input interface, connect your playback device to any one of the available inputs.
②PC or Laptop to HDMI or DVI Input, most common.
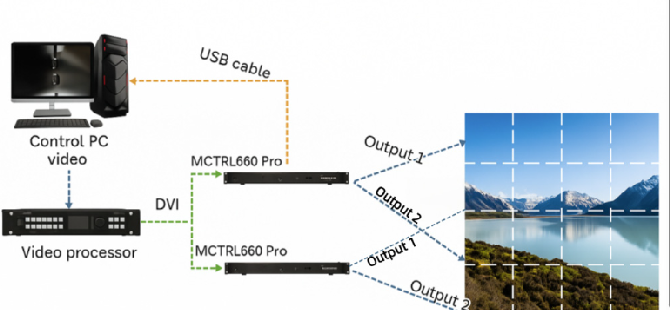
3.Processor to Large LED Screen Network port output or OUT zone to crucial:
①The row of Gigabit Ethernet ports LED OUT on the rear panel outputs signals to the screen and is designed specifically for connection to the receiving cards inside the LED cabinets.
②Plug one end of the network cable into any OUT port on the processor.
③Plug the other end into the IN port of the first receiving card.
④Multi cabinet cascading connect the OUT port of a receiving card to the IN port of the next receiving card via a network cable, daisy chaining the entire array of cabinets in sequence.
4.PC communication debugging, must be connected when a screen is used:
Choose one of the two methods, USB is preferred for greater stability:
①USB B cable: Processor rear-panel USB to Computer USB (Recommended).
②Direct Ethernet connection: Connect the computer’s network cable to the processor’s dedicated LAN debug port, and set the IP address to the 192.168.0.X subnet.
(3)Power up sequence to prevent card burnout:
①First, turn on the power for the LED large screen cabinets to energize all of them.
②Then, turn on the power to the video processor.
③Finally, turn on the computer and player signal source.
(4)NovaLCT PC Software to Screen Configuration, Must be performed after wiring is complete, otherwise, the screen will remain black:
①Open the NovaLCT software, detect the device, and perform an Advanced Login using the password 666.
②Go to Display Configuration to Smart Settings and enter the pixel width and height of the cabinet, as well as the number of cabinet rows and columns.
③For each OUT port on the processor, configure the number of cabinets driven by that port.
④Draft the cabinet cabling diagram, matching the actual cascading sequence of the network cables.
⑤Click to commit the settings to the receiving card, parameters are saved and retained after power off.
⑥Display red, green, blue, and white test patterns to verify the full screen for missing colors, blackouts, or misalignment.
(5)On site rapid use after screen configuration is complete:
①Press the HDMI and DVI shortcut key on the processor’s front panel to switch the computer signal.
②Use the knob to enter the menu and navigate to Layer Settings, select Full-screen Scaling to fill the large screen.
③Adjust brightness and color temperature, save scenes, and recall them with a single touch the next time you turn on the device.
④No computer needed simply plug in a USB drive and switch the panel to USB mode to play videos and view images.