1)Before entering the Led Display Screen industry, you need to understand three key things.
Led Module Body: They are divided into indoor and outdoor use, and each Led module has a size, such as 320*160mm, 256*128mm, 320*320mm, and they are composed of individual lamp beads. Besides, there are have one input signal port and one output signal port and one power port socket, and use the flat cable to connect the input port of each module, and use a one to two power cable to connect two modules.
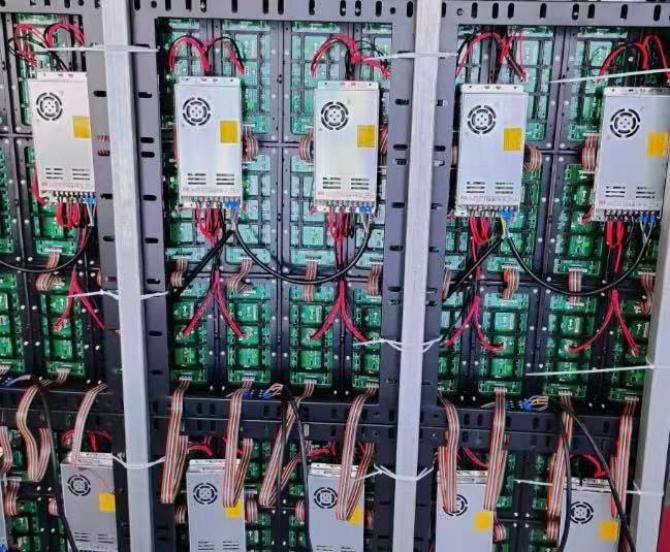
2)The power supply for the display is usually a 5V DC switching power supply, and the red cable is connected to the positive pole +5V and the black cable is connected to the negative pole GND. Please note connecting them in reverse will burn the screen! For the indoor led, one 200W power supply takes for 5 to 8 led modules, for outdoor led, one 300W power supply takes for 6 to 7 led modules.
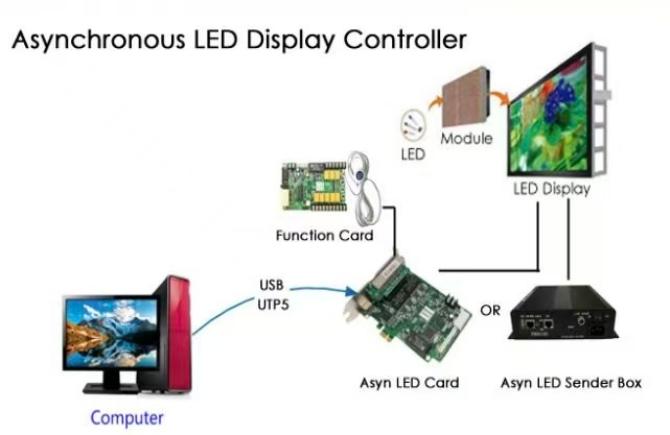
3)The controller is the brain of the screen, responsible for receiving signals and making the screen display content. And the controller is mainly divided into asynchronous control and synchronous control.
①Asynchronous control means that you can edit the content directly using a mobile phone or computer and then send it directly to the led screen. When the screen is powered off and restarted, the content is still the last content sent. It is usually more suitable for small advertising led screens.
②Synchronous control means that you can directly use the computer to send content to the led screen, and the content of the computer is consistent with the content of the led screen. When the computer is turned off, the led screen is also turned off. It usually more suitable for conferences and sports events.
4)How to connect these accessories, the required materials are led module, asynchronous controller, 5V power supply, network cable. Take the indoor p5 led display as an example. All operations are performed under power off condition.
①Use flat cables to connect the input ports between modules.
②Connect the power supply and the screen: Use power cables to connect the power ports between modules. To find the output terminal of the power supply with +V and -V or GND marks, use the red wire to connect +V to the VCC or +5V interface of the unit board, and use the black wire to connect -V to the GND interface of the unit board.
③Connecting the controller to the screen: Plug one end of the network cable into the network port of the controller, which is usually marked with LAN or output, and the other end into the input port of the unit board. Usually, there is only one network port on the unit board that is an input port.
④Connect the controller to the power supply: In the same way, connect another set of red and black wires from the power supply to the power input terminals VCC and GND of the controller.
⑤Preliminary power on test: Check that all cables are connected correctly. Turn on the power, at this point, the screen may light up full white, full red or flashing, which indicates that the hardware connection is basically successful. And the controller indicator light will also light up.
5)Software setup and installation: Ask for the control software from the merchant where you purchased the controller, or download it from the official website of the controller brand. Common software include HDset, Linsn, and NovaLCT.
①Connect to computer: Use a USB flash drive or USB cable to connect the controller to the computer.
②To set the screen parameters, open the software and find the settings or screen management options.
③Set the resolution: Enter the pixel dimensions of your unit board. For example, a P5 unit board is usually 64×32 pixels. If you only have one, the width is 64 and the height is 32.
④Set the scanning method: This is where errors are most likely to occur! Be sure to ask the seller for the scanning model or interface definition of your unit board, such as 1/8 scan, 75 interface, etc. There is a drop-down menu in the software.
⑤Select the correct option provided by the seller. Making the wrong selection will result in a distorted screen.
⑥Send the configuration: Click the Send to Controller button. If the settings are correct, the screen will display a solid color such as red or green, indicating that it now recognizes the screen.
6)Make a program to play, create the content you want to display and send it to the screen.
①Create a program: On the main interface of the software, click Add Program or Create New.
②Adding Regions/Window: A program can contain multiple regions. For example, Region 1: A full-screen image or logo. Region 2: A line of text that scrolls from right to left, such as a welcome message. Region 3: A clock that displays the real-time date and time.
③Editing Content: Text: You can set the font, color, scrolling speed, and method. Image/Video: Import files, supporting common formats such as JPG, BMP, and AVI. Special Elements: Software often comes with built-in plugins for clocks, temperature, and timers, which can be directly added by dragging and dropping.
④Send program: For asynchronous controllers, click Send to USB drive or directly to controller. After sending, unplug all cables, leaving only the power cord and the network cable connected to the screen. The screen will start playing automatically! For synchronous controllers, you need to keep the computer turned on and running the software.
